Monday, June 28, 2010

Milk-Soaked Corn?

Milk-Soaked Corn? Never heard of it. Not until this past weekend when I had a PBS cooking show on for background noise!  Barbecue America. He was soaking raw corn in milk, sugar, salt and pepper. Looked interesting, so I started googling milk-soaked corn. Some versions used milk-soaked paper towels that you wrapped, soaked with milk, around an ear of cleaned corn, wrapped in foil and grilled. Others said to take the silk off, but leave the husks on, no paper towels.  Still more had you boiling the corn in a milk and water solution. I decided to follow the guy on TV and soak the corn in a large bowl of milk, with a bit of sugar mixed in, about a tablespoon or two, and a little salt and pepper. I took the silk off and left the husks on. It was in the frig for over an hour, and the corn was turned frequently, so it all got soaked.


I drained the milk but kept the husks on and wrapped it in foil, and grilled them. The corns were excellent. Would definitely try this one again, maybe next time leaving the foil off and grilling them in just the husk to get a more grilled flavor.


Milk-Soaked Grilled Corn on the Cob
Printable Recipe

6 ears corn, silks removed, leave the husks on
1 quart any kind of milk
1 -2 tablespoons sugar
salt and pepper, to taste

Put the milk, sugar, salt and pepper in a large bowl and mix it around to dissolve the sugar and salt.

Pull the husk back from the corn, but don't remove it. Remove as much silk as you can and pull the husks back to cover the corn.

Add the corn to the bowl with the milk, and refrigerate for an hour or more. If the milk doesn't cover, then just come back and turn the corn a few times! Drain the corn, but do not rinse. Cover with foil or just grill them in the husk on medium-high for about 30 minutes, turning occasionally. Butter them if you like and serve.

Sunday, June 27, 2010

Monday Mosaic: Egg-siting Mosaics!

The incredible edible egg...

Joining Mary from The Little Red House for another Mosaic Monday!  Stop by the Little Red House to see lots of fantastic Mosaics every week!


We like plain basic egg salad, no add-ins, no pickles, no olives, no paprika, no anything! Just eggs, Hellman's mayo and some salt and pepper!  but I do occasionally add sauteed mushrooms and caramelized onions to basic egg salad. and it's fantastic! I just didn't do it this time. This time is plain. On a mini pita. For lunch. Took less than fifteen minutes! Only one out of eight eggs was a lousy peel! and if you notice in the mosaic, no green ring around the yolk? Tried something new I had heard awhile back online somewhere. You bring the water to a rolling boil with the eggs in the pot, turn off the heat but leave the eggs on the burner, covered for 11 minutes. Fully cooked and no ring! I still need to work on peeling though!


Basic Egg Salad
Printable Recipe

8 hard-boiled eggs, peeled and chopped
salt and pepper, to taste
1/4 cup Hellman's mayonnaise (more or less depending how much you like mayo!)

In a medium bowl mix all ingredients. Add any optional ingredients you want... celery, dry mustard, dill, olives, relish, whatever you like, until well blended. Cover and chill.

 ~~~~~~~~~~~~~~~~~~~~~~~~~~~~

What do you call a chicken that crosses the road, rolls in the
dirt, crosses the road, and rolls in the dirt again?
A dirty double-crossing chicken!

 and last but not least...

What do you get when you cross a chicken with a bell?
An alarm cluck

Saturday, June 26, 2010

Fried Chicken Cutlets

Since I had an abundance of roasted tomatoes, and I spent the day frying and freezing chicken cutlets, I figured for dinner I'd make something up to use both. So I rummaged through the frig and came up with a bag of fresh baby spinach. Lined a sheet pan with the spinach, drizzled it with olive oil, garlic, salt and pepper and put a fried cutlet on top. Topped that with some shredded mozzarella and then topped it off with yesterday's roasted tomatoes.

On the side was Penne alla Vodka. With whole wheat pasta.  It was a bad idea to serve it with the whole wheat. We like regular pasta better or that smart taste pasta or whatever kind of pasta, the kind that leans more towards regular but says it's healthier for you. Just not straight whole wheat. Kind of gritty, grainy, and tasted it like cardboard. Not that we've ever eaten cardboard. Not that I know of anyway. This was Trader Joe's whole wheat penne, maybe it's just more whole than we are used to, the pizza place has whole wheat we like with a broth sauce and some vegetables, maybe it's less than whole? The vodka sauce came from a jar, that was good. Can't all be from scratch when you're in a rush for dinner! And somehow, we're always in a rush for dinner.


 Chicken cutlets fried with fresh breadcrumbs


 Spinach, chicken, mozzarella, Parmesan and roasted tomatoes ready for the oven


Time for dinner...

Thursday, June 24, 2010

Flashback Friday: Roasting Tomatoes!

So I won't be getting any homegrown tomatoes this summer, the weather was lousy and cold right into May and we never did make it to the nursery! Last year was no better for tomatoes! But no worries, the supermarket seems to have an abundance of good tasting tomatoes, not to mention a pretty nice variety these days! and when the tomatoes are good, roasted tomatoes are amazing. And when they're not so good, roasted tomatoes are still amazing! The roasting really brings out such great flavor. So I thought I'd try Michael Chiarello's recipe for roasted tomatoes this time. His are broiled. and I'll flashback to last summer when I roasted them with a different recipe.

Here's the tomatoes. Campari Tomatoes. From the supermarket. Not bad looking. They taste very sweet, too!

Here's the flashback from last year...
Sherry Tomatoes! I roasted the tomatoes instead of sautéing them first, and they came out great!


You can find the original post and recipe on Sherry Tomatoes here, or a printable recipe here!
 or if you like just a plain, versatile, slow-roasted tomato, then just preheat the oven to 300° F, line the tomato halves or slices on a baking sheet, drizzle with oil, some fresh chopped garlic, salt and pepper; then roast until they are shriveled and caramelized, but still have some juice in them!

and here's the new batch of roasted tomatoes...
THEY'RE BROILED!
Took all of 15, maybe 20, minutes! I forgot to add the herbs! Still delicious.


Roasted Tomatoes
Source: Food Network, Easy Entertaining with Michael Chiarello
Printable Recipe

24 plum (Roma) tomatoes, halved lengthwise (I used Campari tomatoes)
Coarse salt and freshly ground black pepper
6 tablespoons extra-virgin olive oil, plus more for storing
2 tablespoons herbs, your choice
1 clove garlic, minced

Preheat the broiler.

Arrange the tomato halves cut side up on a baking sheet. Season with salt and pepper. In a small bowl, combine the olive oil, herbs, and garlic. Spoon a little over each tomato half, stirring the mixture before each spoonful!

Broil until the tomatoes are soft and shriveled but still retain some moisture, about 15 to 20 minutes. How long depends on how juicy the tomatoes are.  Let cool completely, Chop tomato halves roughly into a quick sauce, if you like, or top a toasted baguette slice.

 ~~~~~~~~~~~~~~~~~~~~~~~~~~~~~~~~~~~~


Joining Suzy from Kitchen Bouquet for another Flashback Friday! Click here to see more Flashbacks with Suzy!

Wednesday, June 23, 2010

On the side...

Tried some new dishes recently that we really enjoyed! Black-eyed Pea and Jalapeno Salad. and Rosemary-roasted carrots! The black-eyed peas were great,  I went very easy on the jalapeno's, next time would use more than the one. And I would use a bit more vinegar in the dressing next time. Couldn't get sprouts the day we went to the market. There couldn't possibly be a mad rush for sprouts for Father's Day weekend? Could there? So we went sprout-less. Still good, but next time I'll plan ahead (that doesn't happen too often!) and use the sprouts! Of course I found all the sprouts I needed this morning when I went to the store, when I didn't need them. I bought some anyway. Found pea sprouts to try, never had those!

Another recent recipe that was really very good was Rosemary-Roasted Carrots! We loved it, thanks CindyM. Woodie raved about them so we gave them a try and loved them, too. Didn't get crispy for me, but they are so good anyway! I had thrown some that had cooled into a Spinach salad I had made, and it was very good! Definitely they will be do-overs again and again!


Black-Eyed Pea and Jalapeno Salad
Source: Martha Stewart Living, August 2004
Printable Recipe

2 cans (15 ounces each) black-eyed peas, drained, rinsed, and excess water shaken out
2 fresh jalapeno chiles, seeds and ribs discarded, flesh cut into 1/4-inch dice (I used one)
1 small red onion, cut into 1/4-inch dice
3/4 cup sprouts, such as sunflower or alfalfa (I omitted)
1/4 cup extra-virgin olive oil
2 tablespoons red-wine vinegar (I used way more than that)
Coarse salt and freshly ground black pepper

Put black-eyed peas, jalapenos, onion, and sprouts in a large bowl. Add oil and vinegar, and toss well. Season with salt and pepper.


Rosemary-Roasted Carrot Fries
Source: CindyMac
Printable Recipe

3 or 4 large carrots, peeled and cut into sticks
2-3 teaspoons olive oil
1/2 teaspoon sugar (optional)
coarse salt
2-3 teaspoons fresh chopped rosemary

Toss carrot sticks with olive oil, then add sugar, salt, and rosemary. Place on foil-lined tray and bake at 425° for 20 minutes.

Tuesday, June 22, 2010

Pomegranate Molasses

When I shop I usually go with not too much in mind, sometimes I'll let the grocery shelves be my guide about what's for dinner.  So I'll make do with whatever looks good at the moment. I'm a marketer's dream. New? Improved? I'll try it? Trial size? I'll take a chance! So after hearing about pomegranate molasses a while back, I looked for it and finally found some. Now what to do with it? An internet search brought up a really great sounding recipe and when I clicked to it, the picture was divine. Looked just so good to me. Of course what I turned out looked absolutely nothing like the original recipe. Not even close. But that could be because I didn't follow the directions. But delicious anyway.  Mine was dictated by the smoke alarm, of course. Hey, you know honey has the tendency to smoke and burn. I proved it right.

In the end, it was delicious even with my adaptions from pure laziness. No peeling, no dicing, no time! We loved the flavors, the sweetness of the honey and potato with the tart pomegranate molasses! and the toasty walnuts, in my case very toasted!  My kids had never had pomegranate molasses, they found it very tart. Maybe a bit too tart for them. but the Griller and I loved this one. I posted my adaptions and a link to the original! and of course I didn't take a picture of the burned parts!

Not pretty but it sure did taste great!


Honey Roasted Sweet Potatoes with Pomegranate Glaze
adapted There's Always Thyme to Cook
Source: original recipe created by Susan Russo of Foodblogga.com
Printable Recipe

Potatoes:
3 large sweet potatoes, sliced somewhat thick
2 teaspoons olive oil
3 tablespoons honey
2 sprigs thyme, plus 1 extra for garnish
salt and fresh ground pepper
1/3 cup chopped walnuts
3 tablespoons pomegranate molasses

*If you don't have pomegranate molasses then you can mix 3 tablespoons pomegranate juice with 1 tablespoon honey OR mix 2 tablespoons pomegranate juice with 2 tablespoons dark brown sugar and reduce it in a saucepan on the stove until thickened.

Pomegranate seeds (arils) for garnish

Preheat the oven to 400 degrees F.

In a large bowl toss the potatoes with olive oil, honey, thyme, and salt and pepper, until well coated. Place the potatoes on a sheet pan or a baking dish, lined with aluminum foil for easier cleanup.

Roast potatoes for about 40-45 minutes, or until just tender when pierced with a fork. Sprinkle the walnuts around the potatoes and drizzle the pomegranate molasses on top of the potatoes and roast for about five more minutes.

Place potatoes in a serving dish, season to taste with salt and pepper. Sprinkle with pomegranate seeds. You can drizzle more pomegranate molasses, if desired.

*Pomegranate molasses (also called pomegranate syrup or paste) is a thick sweet and sour syrup. It can be found in Middle Eastern specialty markets.

Sunday, June 20, 2010

Mosaic Monday: Herbs

Not doing much gardening this summer, the weather was so screwy and cold and I never got anything planted. No tomatoes, no peppers, no lettuces :(  But much to my surprise all the herbs came back and they came back really nice and full! I thought the rosemary was gone, but despite looking pretty bad, rather yellow and sad, it survived a few blizzards, and a really big Nor' Easter! It came back to a beautiful green color, looking lush and much thicker.


A great recipe to use up some of the fresh rosemary is Lidia's Mother's Chicken and Potatoes! It's delicious!  I've posted it before but it's so good, it deserves another look!


Lidia's Mother's Chicken and Potatoes
Source: adapted, Lidia's Family Table by Lidia Bastianich
Printable Recipe

2 1/2 pounds chicken legs (separated the drumsticks from the thighs) or assorted pieces (bone-in) (I take the skin off! Cut big pieces, like breasts in smaller pieces, and the tips from wings!)
1/2 cup canola oil
1/2 teaspoon salt, or more to taste
1 pound small potatoes, preferably no bigger than 2 inches across (I used fingerlings, sliced lengthwise)
2 tablespoons extra-virgin olive oil or more
2 onions, peeled and quartered lengthwise
2 branches fresh rosemary
2 pickled cherry peppers, sweet or hot, or none -- or more! Cut in half and seeded (I used both sweet and hot)
Bacon (optional)

Rinse the chicken pieces and pat dry with paper towels.

Pour the canola oil into the skillet and set over high heat. Sprinkle the chicken with 1/4 teaspoon salt on all sides. When the oil is very hot, lay the pieces in it, skin side down, an inch or so apart -- watch out for oil spatters. Don't crowd the chicken: if necessary, fry it in batches, with similar pieces (like drumsticks) together.

Let the chicken pieces fry in place for several minutes to brown on the underside, then turn and continue frying until they're golden brown on all sides, 7 to 10 minutes or more. Fry breast pieces only for 5 minutes or so, taking them out of the oil as soon as they are golden. Let the bacon rolls cook and get lightly crisp, but not dark. Adjust the heat to maintain steady sizzling and coloring; remove the crisped chicken pieces with tongs to a bowl.

Meanwhile, rinse and dry the potatoes; slice each one in half, then toss them with the olive oil and 1/4 teaspoon salt.

When all the chicken and bacon, if using, is cooked and out of the skillet, pour off the oil. Return the skillet to medium heat and put in all the potatoes, cut side down in a single layer, into the hot pan. Drizzle a bit more oil if the pan seems dry. Fry and crisp the potatoes for about 4 minutes to form a crust, then move them around the pan, still cut side down, until they're all brown and crisp, 7 minutes or more. Turn them over, and fry another 2 minutes to cook and crisp the other sides of the potatoes.

If cooking everything together:
Still over medium heat, toss the onion wedges and rosemary branches around the pan, in with the potatoes. If using cherry peppers (either hot or sweet), cut the seeded halves into 1/2-inch-wide pieces and scatter them in the pan too.

Return the chicken pieces -- except breast pieces -- to the pan, pour in any juices that have accumulated. Raise the heat slightly, and carefully turn and tumble the chicken, potatoes, and onion (and bacon and/or pepper pieces), so they're heating and getting coated with pan juices but take care not to break the potato pieces. Spread everything out in the pan - potatoes on the bottom as much as possible, to keep crisping up - and cover.

Return the heat to medium, and cook for about 7 minutes, shaking the pan occasionally, then uncover, and tumble the pieces and potatoes (and bacon rolls) again. Cover, and cook another 7 minutes or so, adding the breast pieces at this point. Give everything another tumble. Now cook covered for 10 minutes more.

Remove the cover, turn the pieces again, and cook in the open skillet for about 10 minutes, to evaporate the moisture and caramelize everything. Taste a bit of the potato (or chicken) for salt, and sprinkle on more as needed. Turn the pieces now and then; when they are all glistening and golden, and the potatoes are cooked through, remove the skillet from the stove. Serve family style.
 
English Thyme, Spearmint, Rosemary and Oregano


Chives


Joining Mary from The Little Red House for another Mosaic Monday!  Stop by the Little Red House to see lots of fantastic Mosaics every week!

Friday, June 18, 2010

Flashback Friday: Ice Cream Socials

I'm joining Suzy at Kitchen Bouquet for another Flashback Friday! Check out Suzy's Flashback Fridays for more "new visits to old favorites!"


Flashing back to last summer when Suzy from Kitchen Bouquet hosted a good old fashioned ice cream social! Of course I forgot to put the freezer thing in the freezer, but I managed to join in anyway!

 and Suzy is having another one. Details will be announced soon. But I'm ready this time, the freezer thing is in the freezer already!


Malted Milk Shakes
source: Martha Stewart 
Printable Recipe

Makes 4 shakes (I got less, maybe Martha uses smaller glasses!)

1 cup milk
6 tablespoons malted-milk powder, plus more for garnish
1 pint vanilla ice cream
1 pint chocolate ice cream
Malted-milk balls, for garnish (optional)

Place 1/2 cup milk and 3 tablespoons malt powder in the jar of a blender, and process until malt is dissolved. Add half the vanilla ice cream, and blend until smooth. With the motor running, add remaining vanilla ice cream, 1 scoop at a time, until it is fully incorporated. Pour half the shake into a glass measuring cup, and place in freezer. Divide remaining half between two glasses, and place glasses in freezer. Allow to chill for 10 minutes before proceeding to step two.

Place remaining 1/2 cup milk and remaining 3 tablespoons malt powder in clean jar of blender, and process until malt is dissolved. Add half the chocolate, or strawberry, ice cream, and blend until smooth. With motor running, add remaining ice cream, one scoop at a time, until fully incorporated. Divide half the shake between two empty glasses, and top off the two partially filled glasses from freezer with the remainder. Allow the half-filled glasses to freeze for 10 minutes. Stir reserved vanilla shake before topping off remaining glasses. Garnish with malted-milk powder and malted-milk balls if desired, and serve immediately.

I garnished with Nestle's Quick!

Thursday, June 17, 2010

Chicken Piccata a new way! and a great Caesar Salad

Chicken Piccata is a big favorite around here. Really big. So big that Miss Picky requests it and while this one won't replace our favorite, it was still a great dish! Really good! Needed more sauce, and I went too heavy on the herbs, but really good. Even when I forgot to add the chicken broth until the very last minute. Still good.  Reduced the sauce to almost nothing. Still good. The fresh parsley makes the bread crumb topping a little greenish, but looks aren't everything! I used thin-sliced chicken cutlets and layered them in the dish! Served with brown rice and sauteed tomatoes and zucchini. and a Caesar salad that was excellent! Definitely making that again. and soon!

Layered cutlets and because I used two packages, the ones underneath didn't get much topping! Still tasted good! The topping is the last step.


The salad is from a new cookbook, Frankie's Spuntino Kitchen Companion and Cooking Manual! The recipe was in the Serious Eats newsletter. Nothing like having a great recipe delivered right to you, rather than searching and searching and searching! This was definitely a keeper!  Even when I added ALL the water at the beginning and it was a little thin, STILL EXCELLENT! Next time I'll follow directions, yeah, that would be something, and drizzle the water in at the end just to thin it out, not drown it!  Even Grandma liked it, she must be getting used to hot sauce these days! Never once waved her hands that her mouth was on fire, and never once reached for the water! Hey, if you can't beat them, join them!  So I added a few extra dashes of the Tabasco, no complaints. Not even Miss Picky.


Piccata Chicken Gratin
Source: The Seattle Times Test Kitchen. Adapted from "Gratins: Savory and Sweet Recipes from Oven to Table" by Tina Salter.
Printable Recipe

1 lemon
6 skinless and boneless chicken thighs (I used thin-sliced chicken cutlets)
2 large cloves garlic, minced
3/4 teaspoon dried rosemary, crushed
2 teaspoons minced fresh thyme
2 tablespoons olive oil
Nonstick cooking spray or oil
1/3 cup chicken broth
1/4 teaspoon kosher salt or to taste
Freshly ground black pepper

Topping:
1/2 cup fresh breadcrumbs
1 tablespoon minced fresh parsley
2 teaspoons minced fresh thyme
1 tablespoon capers, drained (I omitted)
2 teaspoons lemon zest
2 tablespoons olive oil

Zest the lemon, mince 2 teaspoons and set aside. Juice the lemon and reserve 1 tablespoon. Put the chicken in a dish and sprinkle with garlic, rosemary and thyme. Whisk together lemon juice and 2 tablespoons olive oil. Pour over chicken, cover and marinate at room temperature 1 hour or refrigerate up to 24 hours.

Preheat oven to 350 degrees. Lightly spray or oil a 9-by-13-inch baking dish. Place chicken in the dish, discard any leftover marinade and pour the chicken broth around the chicken. Sprinkle with salt and pepper. Bake 20 minutes.

While chicken is baking, combine breadcrumbs, parsley, thyme, capers and lemon zest. Drizzle with olive oil and toss until the crumbs have absorbed the oil.

Remove baking dish from oven. Drain broth into a small saucepan. Spoon the topping evenly over the chicken and continue baking 15 minutes or until chicken is cooked through. If topping needs more browning, place under a hot broiler. Boil the reserved broth until reduced to about 3 tablespoons. Transfer chicken to plates and drizzle a little of the reduced broth around it. Serve immediately.


Frankie's Romaine Hearts with Caesar Salad Dressing
Source: Serious Eats Recipe Newsletter: June 16. Adapted from The Frankies Spuntino Kitchen Companion and Cooking Manual by Frank Falcinelli and Frank Castronovo.
Printable Recipe

3 hearts of romaine (pull away the floppiest, greenest outer leaves)
1/3 cup grated Pecorino Romano, plus additional cheese for serving (I used grated Parmegiano-Reggiano)
1/2 cup Hellmann's mayonnaise
1/4 cup water (more or less depending on how thick you want the dressing!)
1 1/2 teaspoons red wine vinegar
1 garlic clove
2 anchovy fillets (I used anchovy paste)
1/4 teaspoon Worcestershire sauce
1/4 teaspoon Tabasco
8 turns freshly ground white pepper
Fine sea salt, if needed
Freshly ground black pepper
Croutons (optional)

Trim the root ends from the romaine, separate the leaves, and wash and dry them. Put the lettuce in the fridge to chill while you prepare the dressing. (I cut the romaine in small pieces!)

Combine 1/4 cup of the Pecorino with the remaining ingredients (except the black pepper) in a blender (or food processor) and puree until the dressing is smooth. (If you don't have a blender, mince the garlic and anchovy, and whisk them together with the rest of the dressing ingredients.) Taste and add salt if necessary; the cheese, the Worcestershire, and the anchovies are all salty, so you probably won't need any additional salt. Loosen the dressing with water as needed starting with the prescribed 1/4 cup.

Toss the chilled lettuce with the dressing in a large bowl. Transfer to serving plates or a serving platter and finish with a generous sprinkling of the remaining grated cheese and a few turns of black pepper. and the croutons if you are using them!

Wednesday, June 9, 2010

And even more grilling...

Grilling indoors and out! The Grill outside always gets a good workout, but lately so has the panini grill. We picked up fresh hamburger buns from the bakery and I got the brilliant idea to throw it all on the panini grill. The Griller grilled the burgers outside first and that soft, freshly baked, squishy hamburger roll crisped up so nicely on the panini machine. Filled it with red peppers that were roasted first, fresh mushrooms, raw Vidalia onion and a slice of cheddar cheese. A little, actually a lot, chipotle mayo and panini perfection was achieved! The mushrooms and the onions softened and the top sort of slid off when I closed the lid a bit, and the cheese and onions got a little sloppy but this one was a winner! I am getting more use out of that panini griller than I ever thought I would.

Got a little more ambitious and made a few salads for the side. We won't discuss the roasted Sweet Potato chunks I forgot about in the oven. Those did not survive. but the salads were really good.

The Fennel-Mushroom salad is so good, we've had that one before! Tried two new ones. A pasta salad from my friend Cindy that was a big winner!  So was the Three-Bean Salad. and all were delicious leftovers for lunch with a turkey sandwich today!


Hamburger Panini


Shaved Fennel, Mushroom and Parmesan Salad
Source: posted Gardenweb by MQmoi, recipe by Alice Waters (Chez Panisse)
Printable Recipe

fennel (sliced thin)
fresh lemon juice
olive oil
salt and pepper
thinly sliced mushrooms
Parmesan shavings

Cut off the feathery tops of the fennel at the base of their stalks and remove the outer layer of the bulbs. Slice the bulbs very thin with a mandolin or a very sharp knife.

Assemble the salad in layers on a large platter or on individual salad plates.

First make a layer of the fennel slices. Squeeze lemon juice evenly over the fennel and drizzle with fruity olive oil, salt and pepper. Then make a layer of the mushrooms, also sliced very thin. Squeeze more lemon juice over them, drizzle evenly with olive oil, salt and pepper.

Grate or cut thin shavings of the Parmesan with cheese slicer or a vegetable peeler and arrange them on top of the salad. Drizzle with olive oil. Serve immediately.

Other options are artichokes and balsamic vinegar. If you don't like the raw mushrooms, you can also saute them.


Three-Bean Salad with Vinaigrette

Source: Martha Stewart, Everyday Food August 2007
Printable Recipe

note: I used frozen wax and green beans, already trimmed! and steam in the microwave!)

8 ounces green beans, stem ends removed, halved on the diagonal
4 ounces yellow wax beans, stem ends removed, halved on the diagonal
2 tablespoons Dijon mustard
2 tablespoons red-wine vinegar
2 tablespoons olive oil
Coarse salt and ground pepper
1 can (15 ounces) cannellini beans, rinsed and drained
1 chopped shallot

Fill a large bowl with ice water; set aside. Set a steamer basket in a large pot with a lid. Fill with a couple inches of water, enough to come just below basket; bring to a boil. or you can steam in the microwave.

Place green and wax beans in the steamer basket; reduce heat to a simmer. Cover pot, and steam until beans are crisp-tender, 6 to 8 minutes. With tongs or a slotted spoon, transfer beans to ice water. Drain, and pat dry.

In a medium bowl, whisk together shallots, mustard, vinegar, and oil; season with salt and pepper. Add all the beans; toss to coat.  If storing, refrigerate up to 1 day; bring to room temperature before serving.


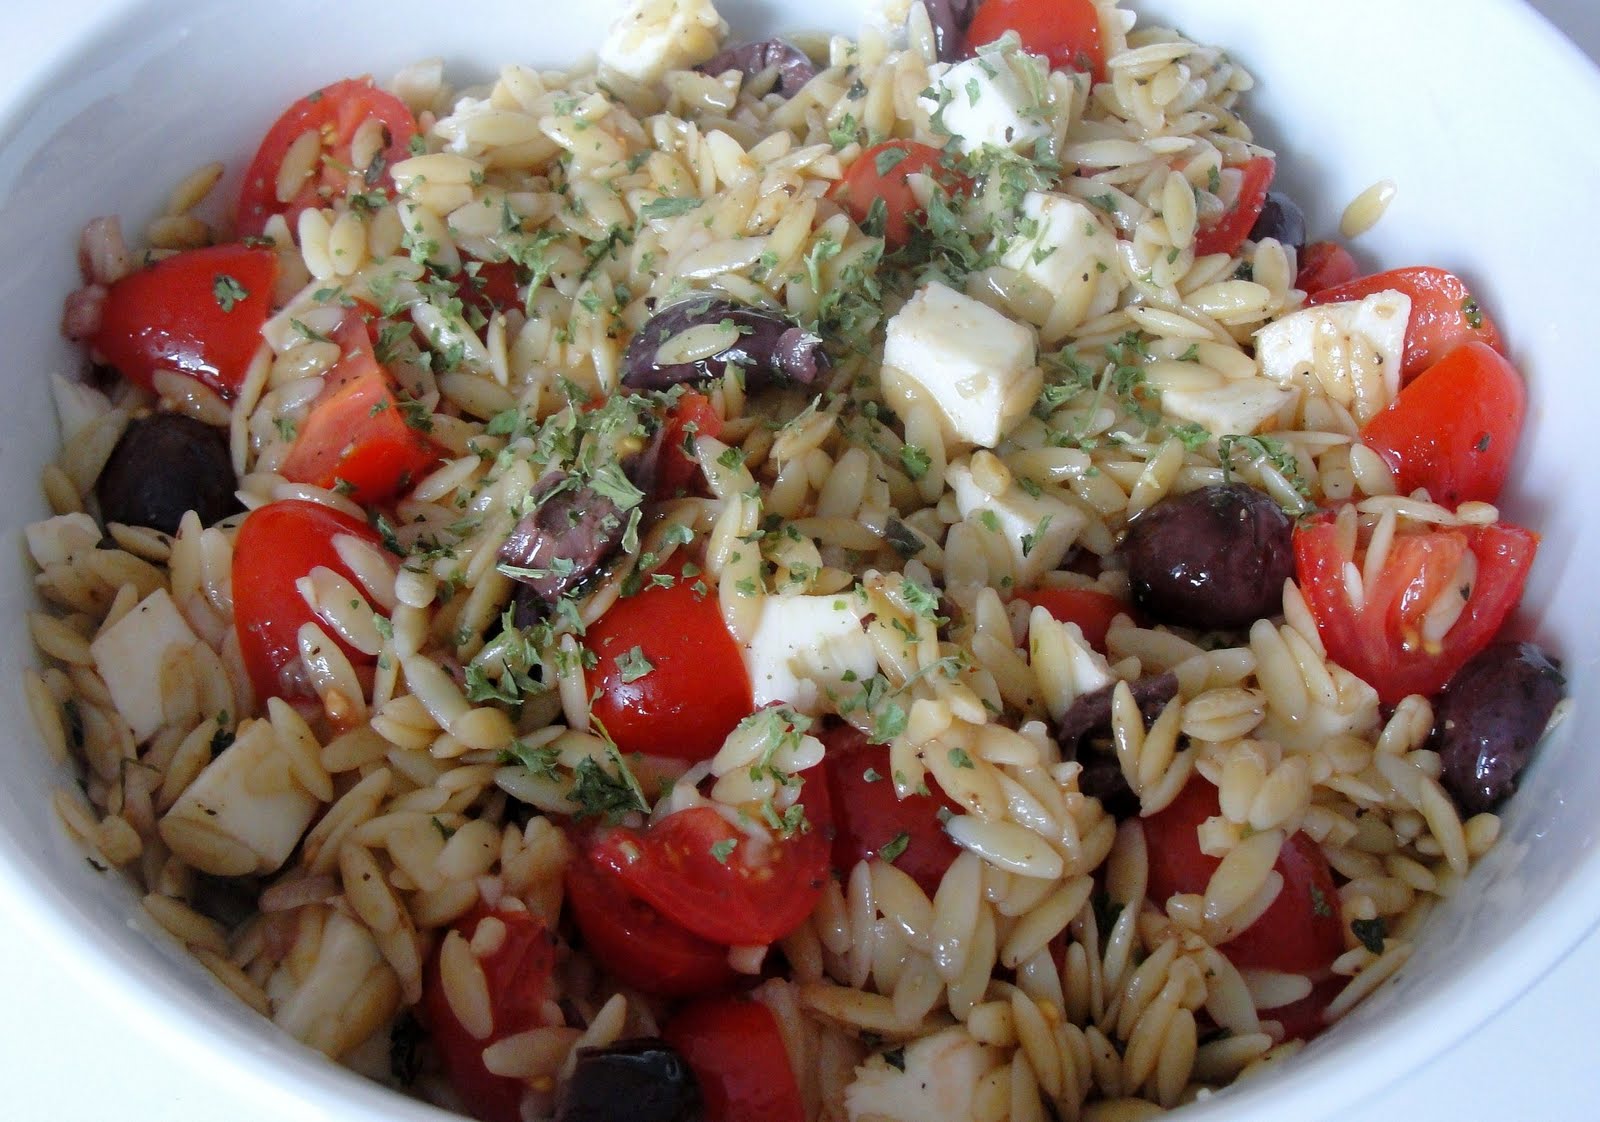
Bruschetta Orzo Salad
Source: A recipe from Bon Appetit, adapted by Cindy 5NY
Printable Recipe

1 cup orzo pasta
2 tomatoes, chopped
1/2 cup chopped red onion
1/3 cup chopped fresh basil
optional: kalamata olives, feta, tuna (I used fresh mozzarella)

3 tablespoons balsamic vinegar
2 cloves garlic, minced
2 tablespoons olive oil
Freshly ground pepper, to taste

Cook pasta according to package directions for about 8 minutes, or until just tender; drain.
Combine dressing ingredients.
Place hot pasta in large bowl and toss with a little dressing; cool about 15 minutes, tossing occasionally.
Add remaining ingredients and dressing to bowl and toss to mix well.
Cover and chill at least 1 hour.
Serve chilled or at room temperature.

Sunday, June 6, 2010

Mosaic Monday: Breakfast Granola

We love granola, we don't always agree which kind so we end up with all different kinds, chocolate granola, banana granola, apple granola. It's endless. So is the collection of bags and boxes cluttering the pantry! We love it on frozen yogurt, unfrozen yogurt, ice cream, fruit, on it's own. So I thought how hard could it be to make that at home? Not hard at all. The hardest part was settling on a recipe. and not burning the whole thing. Ended up taking what I liked from a few recipes I found on the internet and some ideas from my friend, Cindy5NY. Made it plain this first time. The biggest deal is making sure you don't cook it too long. Fine line between good and burnt! I was this close. Ended up with a really good batch, but it was close! Not even a peep from the smoke alarm, also known as the timer!

GRANOLA BEFORE BAKING

AND
GRANOLA AFTER BAKING

Breakfast was vanilla yogurt and blueberries!


It made about four or five cups of granola, or at least that's what we have in the container. I couldn't help but grab some tastes right out of the oven. A scoop of ice cream would have been a great accompaniment for the warm, freshly baked granola.

Granola
Source: compiled from different recipes on the internet
Printable Recipe

3 cups rolled oats (old-fashioned oats, not quick cooking)
1 cup chopped walnuts
1 cup sunflower seeds
3/4 cup shredded sweet coconut
1/4 cup light brown sugar
1/4 cup honey
2 tablespoons canola oil
3/4 teaspoon salt
dried fruit, optional
1/4 teaspoon cinnamon, optional

Preheat oven to 300 degrees F.

In a large bowl, combine the dry ingredients.

In another bowl, combine honey, oil, and salt. Drizzle the honey mixture into the bowl with the oats and mix it all together. Pour onto a large, rimmed sheet pan. Bake for about 30-35 minutes, stirring every 10 or 15 minutes. It should be golden brown. Be careful not to burn it.

Remove from oven and cool completely. Add raisins or dried fruit, if you like, and mix until combined. Let cool. Store in an airtight container.

You can use any nuts you like or leave them out, use maple syrup instead of honey. This is just a basic recipe, make it any way you like. Add vanilla extract, add some orange zest, cloves, anything goes!


Joining Mary from The Little Red House for another Mosaic Monday!  Stop by the Little Red House to see lots of fantastic Mosaics every week!

Friday, June 4, 2010

Flashback Friday: Favorite mushrooms...

Hebrew National hot dogs come seven in a package and buns come in packages of eight! So what to do with leftover hot dog buns from the holiday weekend? Make stuffed mushrooms using fresh bread crumbs! Just whiz them up in the food processor first. and don't crowd the processor or you'll end up with bread powder on the bottom and chunks on the top. Ask me how I know that one?


I'm always going back to this recipe. It's so easy and one of our all time favorites. So here we go again. The picture is new, the recipe is old.  It's basic, add what you like to it, different cheeses, some cooked sausage, chopped tomato, zucchini. Whatever you like!  If you like to sop sauce with a piece of bread then just add a little bit of butter or olive oil to the baking dish. It mixes with the mushroom juice and you can dip a piece of crusty bread to soak up the juices. Best part!


I made them two ways this time, mostly because I only had one tomato left and there was no room for three mushrooms in the baking pan I used. So I took a gratin dish and put down three slices of tomato, sprinkled it with a little Parmesan, and put a stuffed mushroom on top of each tomato slice. Drizzled it with a little olive oil and baked it in the oven with the other pan of mushrooms. After about twenty minutes, I put a little bit of a slice of muenster cheese on top of the mushrooms with tomato and broiled them all until the ones with cheese got all bubbly!


They were great, the plain ones, but especially the ones with the tomato and cheese! Definitely making it again this way.


Stuffed Mushrooms
Printable Recipe

1 lb (about 20) white mushrooms, stemmed (save stems for stuffing)
2 shallots, finely chopped by hand or food processor
2 cloves fresh garlic, finely chopped
salt and pepper
1/2 freshly grated Parmigiano-Reggiano
1/2 cup bread crumbs (fresh or dried)
3 tablespoons olive oil
2 tablespoons butter

Preheat oven to 375°. Remove stems from mushrooms and chop by hand or in a food processor.

Sauté the onions in olive oil and butter, until soft and translucent. Add the garlic, salt and pepper. Sauté until the onions are golden brown. Add the chopped mushroom stems, sauté for a few minutes more. Add the bread crumbs and sauté until the bread crumbs absorb some of the moisture. Mix in a little Parmigiano-Reggiano. Stuff the filling into the mushroom caps. Sprinkle with a bit of Parmigiano. Drizzle a bit of olive oil on top. Put the mushrooms on a baking sheet and bake for 20 minutes. Garnish with a bit of fresh chopped Italian Parsley.

Variations: You can also add a little frozen chopped spinach to the mixture, make sure to squeeze all the excess moisture from it! Also good with a little cheddar instead of Parm. Fontina, Brie, cream cheese.  Use whatever herbs you like, oregano, thyme or parsley.


I'm joining Suzy at Kitchen Bouquet for another Flashback Friday! Check out Suzy's Flashback Fridays for more "new visits to old favorites!"

My original flashback to mushrooms post is here. So this is a repeat of a repeat. Sort of like the Food Network, same thing all the time.

Thursday, June 3, 2010

A revisit to Delmy's meatballs!

Have to say that Trader Joe's Whole Wheat Organic Pasta is very polite. It says please do not overcook! I've never seen this before. Do they know that I have that tendency? How did they know that? My kids have friends that aren't as polite as this pasta is. So I was careful, I did not overcook. My family thanked me! They are polite, too. and no one here likes mushy pasta!


We had Delmy's meatballs with the pasta. Delmy is my son's friend's housekeeper and she makes the best meatballs. Everyone loves them, even Miss Picky. Who, by the way, had a second helping of meatballs. Very teeny, tiny meatballs. Those she likes, not so picky when it comes to meatballs. I've posted about them before. They freeze well and every once in a while it's nice to be able to just defrost something and have dinner on the table in minutes with no fuss and no mess. Unless Grandma drops one on the floor. The dogs like sitting near Grandma.

It might sound as if it would be a sickeningly sweet recipe, it really isn't. It actually sounds like kind of gross combination, but it really does work well together. I tasted it first without knowing the recipe and liked it, the kids raved so the big kid went and asked Delmy for the recipe. It was a big surprise to find that can of cranberry sauce, not to mention the Prego. I assume fine with any jarred sauce, just like it was good with the grape jelly mistake the first time I made them, but better with the cranberry sauce, kids said! So now I stick to the recipe as written. Go figure, normally I deviate, but now I'm afraid to deviate from a can of sauce and a jar of Prego? Miss Picky might go hungry otherwise.


The original post about Delmy's meatballs is here!

Delmy's Meatballs
Printable Recipe

1 can jellied cranberry sauce (or a jar of Grape Jelly!)
1 bottle Heinz chili sauce
1 Vidalia onion
2-3 cloves garlic, minced, chopped, whatever
1/2 jar Prego Spaghetti sauce
4 carrots, sliced into coins
big handful of dried plain breadcrumbs
large package of chopped meat (2 lbs)
2 eggs
1/4 cup water
salt and pepper
couple tablespoons of ketchup
2-3 splashes Worcestershire sauce
4 carrots, washed and peeled and sliced into coins

Mix the eggs, salt and pepper, ketchup, Worcestershire sauce, water, breadcrumbs and chopped meat all together. Make very tiny little meatballs and brown them in a skillet.

Meanwhile, in a pot, heat the garlic and the onions, until the onions start to soften and turn golden. Add the cranberry sauce and mix it up until it melts, then pour in the bottle of Heinz Chili sauce and the half jar of Prego sauce. Add the sliced carrots. Stir everything together and bring to a boil, then lower heat to simmer. Add the browned meatballs and stir. Simmer for at least an hour, stir occasionally. I did two hours.


---------------------------------------

JOINING

 
Back to top