Showing posts with label Magazine Challenge. Show all posts

Saturday, March 26, 2011

Weekend Cooking: Lemony Chicken Saltimbocca

Good thing Suzy at Kitchen Bouquet started the magazine Challenge for March. I still have some on the pile left from February! Getting through February and March and now April magazines are starting to come in and pile up! and I'm joining Beth for some Weekend Cooking!

This one was really good. The prosciutto was sliced so thin, it kept tearing. But I managed. I used thin cutlets and they cook quickly so the prosciutto didn't get crispy, which I think I would have preferred, but we enjoyed this one. It has a lot of flavor and I would definitely make it again. Makes a nice presentation on the plate because you can see the sage leaves through the prosciutto. In our house sage is definitely under-rated and under-used, but I liked it, so I think it'll start showing up more often. I may just have to get a sage plant for the garden!


Lemony Chicken Saltimbocca
Source: Cooking Light, January-February 2011
adapted by There's Always Thyme to Cook
Printable Recipe

4 (4-ounce) chicken cutlets
1/8 teaspoon salt
12 fresh sage leaves
2 ounces very thinly sliced prosciutto, cut into 8 thin strips
4 teaspoons extra-virgin olive oil, divided
1/3 cup chicken broth
1/4 cup fresh lemon juice (about 2 large lemons!)
1/2 teaspoon cornstarch
lemon wedges (optional)

Sprinkle the chicken evenly with salt. Place 3 sage leaves on each cutlet; wrap 2 prosciutto slices around each cutlet, securing sage leaves in place. Heat a large skillet over medium heat. Add 1 tablespoon oil to pan, and swirl to coat. Add chicken to pan; cook for 2 minutes on each side or until done. Remove chicken from pan; keep warm. Combine broth, lemon juice, and cornstarch in a small bowl; stir with a whisk until smooth. Add cornstarch mixture and the remaining 1 teaspoon olive oil to pan;bring to a boil, stirring constantly. Cook for 1 minute or until slightly thickened, stirring constantly with a whisk. Spoon sauce over chicken. Serve with lemon wedges, if desired.


Joining Beth at Beth Fish Reads for her fun Weekend Cooking Party. Every weekend. It's open to anyone who has any kind of food-related post to share!


Check out The Great Cooking Magazine Challenge at Kitchen Bouquet, the March 2011 edition!

Tuesday, March 22, 2011

Simplest Chicken and Leek Stew

Joining I Heart Cooking Clubs for a Jamie Oliver Potluck,  What's On the Menu with Debbie from Dining with Debbie and Suzy's Magazine Challenge for March! I found a couple recipes we've really enjoyed. This one from Food and Wine was so simple, and so easy and so good. And I still screwed up. Just a little. Who knew two TABLESPOONS instead of two TEASPOONS of Dijon could be so noticeable? The Griller thought so, and so did Miss Picky. I liked it a lot, and the big kid and his friends, home from Spring Break and so-so college food, liked it as well! But I would definitely cut back on the mustard next time for the sake of the other two with the sensitive palette! It did have a strong mustard taste. So much for paying attention. I could swear while I was rushing around the kitchen that it said tablespoons. Good thing I wasn't thinking cups! Anyway, I'd definitely make this again, it was easy, it was quick and it really was good. Don't listen to those two :)


Simplest Chicken and Leek Stew
Source: Food and Wine March 2011, recipe by Jamie Oliver
Adapted by There's Always Thyme to Cook
Printable Recipe

2 tablespoons extra-virgin olive oil
2 medium leeks, white and tender green parts only, thinly sliced
1 pound cremini mushrooms, thinly sliced
Salt and freshly ground pepper
1 pound skinless, boneless chicken breast halves, cut into 2-inch pieces
all-purpose flour, for dusting
1 1/2 cups chicken stock
1 tablespoon chopped thyme
2 tablespoons sour cream
2 teaspoons Dijon mustard

In a skillet, heat 1 tablespoon of the oil. Add the leeks and cook over moderate heat, stirring, until softened, about 7 minutes. Add the mushrooms and season with salt and pepper. Cover and cook, stirring, until the mushrooms are tender, about 4 minutes. Remove the leeks and mushrooms onto a plate.

Season the chicken with salt and pepper and lightly dust with flour, shaking off any excess. Heat the remaining 1 tablespoon of oil in the skillet. Add the chicken and cook over moderate heat until golden brown, about 2 minutes per side. Stir in the mushroom and leek mixture. Add the chicken stock and thyme and simmer over moderate heat about a minute or two. Add the stock and simmer over medium-high heat until the stock is reduced a bit, for about 2 or 3 minutes.

In a small bowl, blend the sour cream with the mustard and stir into the stew. Remove the skillet from the heat. Season the stew with salt and pepper and serve with steamed rice.

~~~~~~~~~~~~~~~~~~~~~~~~~~~~~~~~~~~~~~

 Check out The Great Cooking Magazine Challenge at Suzy's Kitchen Bouquet, the March 2011 edition!


and joining in the Jamie Oliver Potluck party going on at I Heart Cooking Clubs. Stop by and join the fun!
IHCCJamieOliver

Thursday, February 10, 2011

Still soup weather so I tried another new one...

I get so many cooking magazines, they tend to pile up sometimes, and there are so many recipes to choose from that I would love to try, but I can't get to everything I would really like to make. So the "to try" pile grows. And grows. But since it's been soup weather for some time here in New York, I decided on a very quick and very easy beef barley soup from EatingWell magazine, called what else but Quick Beef Barley Soup. Too bad when I follow a recipe, I don't exactly follow and it turned out to be not so quick but still very easy. Had to simmer for some time. Much longer than instant or quick cooking. But really good. I used regular pearl barley, not quick, takes much longer to cook, but tastes so good, with a nice chew to it! I subbed chicken soup for some of the beef broth and the water in the recipe, and then added sliced white button mushrooms. If you are looking for a delicious, somewhat quick, no fuss hearty soup, look no further, this fits the bill. A keeper for sure!

Thanks to Suzy at Kitchen Bouquet and her Great Cooking Magazine Challenge for February, my magazine pile is now a little more current, I was still reading from way back in December, but I finally made it all the way to February! I'll be challenging myself for a while, I bookmarked plenty to try. Too bad, but sometimes takeout gets in the way of a good challenge! Not this time. This soup was worth the effort.


Quick Beef and Barley Soup
Source: EatingWell magazine, Jan-Feb 2011
adapted by There's Always Thyme to Cook
Printable Recipe
4 servings

8 ounces sirloin steak, trimmed and cut into bite-size pieces
olive oil
1 medium onion, chopped
1 large stalk celery, sliced thin
1 large carrot, sliced in coins
2 tablespoons tomato paste
1 tablespoon chopped fresh thyme
3/4 cup quick-cooking barley (I used pearled barley and just simmered longer)
2 cups beef broth
3 cups chicken broth
salt and freshly ground pepper, to taste

Sprinkle steak with a little pepper and salt. Heat 2 teaspoons oil in a Dutch oven over medium heat. Add the steak, stirring often, until browned on all sides. Transfer to a bowl.

Add another 2 teaspoons oil, and the onion and celery to the pot and cook, stirring, until it begins to soften, about 3 minutes. Add the carrots and cook for another 3 minutes and stir again. Add tomato paste and thyme and cook, stirring, until the vegetables are coated with the tomato paste. Cook for a couple more minutes.

Add barley, broth, mushrooms, salt, and the remaining 1/4 teaspoon pepper; bring to a simmer. Reduce heat to maintain a simmer; add the beef and juices, cook until the barley is tender. This recipe can be doubled, if leftovers are thick you can thin it with more broth.

~~~~~~~~~~~~~~~~~~~~~~~~~~~~~~~~~~~~~~~~~~~~~~~~~~

 Check out The Great Cooking Magazine Challenge at Kitchen Bouquet, the February 2011 edition!

Saturday, February 5, 2011

Inside-Out Stuffed Chicken

The Great Cooking Magazine Challenge

I got hit with the challenge bug. Suzy from Kitchen Bouquet threw out a challenge and I answered with this really delicious roast chicken. Stop by Suzy's Kitchen Bouquet to join her Great Cooking Magazine Challenge on Sunday, February 6th to take her up on the challenge!


After reading the first reviews on the Martha Stewart site, and listening to my friend, Bubbe, I changed up the directions a little bit. Bubbe thought cooking the chicken for a while BEFORE putting the stuffing might be a good idea, who needs all that fat sucked into the bread? And we thought maybe the bread would be too moist with all the juices. Not a bad idea, so I tried that, but almost dropped the hot chicken on the floor. Miraculous that I didn't! and after only thirty minutes of cooking it wasn't releasing any juices at that point anyway. But the stuffing did well with the shorter cooking time, so I'd do the same thing again. Maybe use a foil pan to roast the chicken to start. My three dogs would have been extremely happy if the chicken had reached the floor!

And then because I never have good results with a high heat, I lowered the temp. I know some folks do fine with high heat cooking, it just never works out for me. So I lowered the temp to 350 degrees F. Came out great! I also used a lot less butter, maybe four tablespoons and instead of onions, I sed two large shallots. Served with green beans, mashed potatoes and gravy, this was a really homey kind of meal!  A very big hit, even with Miss Picky!

If you click on this Martha Stewart link, you'll see the original recipe, along with some reviews! The recipe I have posted on here is my adapted recipe, which worked out really well for us! We absolutely loved it. Great stuffing, the sides that were exposed got crunchy, and the inside of the stuffing under the chicken was really moist! Came out perfect.

Thanks for a great challenge, Suzy, my magazine pile is getting smaller and smaller!
Until next month, LOL!

and just for my friend, Kathleen, of Cuisine Kathleen fame, I am serving this little chickie in a Revol White Chicken Roaster. I know how much she loves that Chicken Roaster!
 
I'm also joining Mary's Mosaic Monday. For more mosaic's stop by the Little Red House!


Inside-Out "Stuffed" Roast Chicken
adapted by There's Always Thyme to Cook
Original source: From Martha Stewart Living, January 2011
Printable Recipe

4 tablespoons unsalted butter, softened
1 large onion, thinly sliced or 2 large shallots
3 celery stalks, chopped fine
3 garlic cloves, minced
Coarse salt and freshly ground pepper
1 pound cremini or white button mushrooms, sliced
6 cups day-old rustic-bread cut in 1-inch cubes (I used a fresh, crusty baguette!)
3/4 cup chicken stock
2 tablespoons fresh lemon juice
1 tablespoon finely chopped fresh sage
1 whole chicken (about 4 1/2 pounds)
1 small lemon or clementine orange (poke holes in it with a fork)

Preheat oven to 350 degrees.


Place chicken in a roasting pan, breast side up, and tuck wings under. Put the lemon (or clementine) inside the cavity and tie legs together with kitchen twine. Pat chicken dry with paper towels. Stuff a tablespoon of butter under the skin on the breast. Season with salt and pepper. Roast uncovered for about 30-40 minutes.

While the chicken is roasting, melt 2 tablespoons butter in a large skillet over high heat. Cook onion, celery, and garlic until translucent, about 5 - 10 minutes. Season with salt. Add mushrooms and 1 tablespoon of butter to the onion mixture. Stir and cook for another ten minutes, until mushrooms soften. Stir in bread, stock, juice, and sage. Mix well so the bread absorbs the juices. Season to taste with salt and pepper. Stir, then put the stuffing mixture in the bottom of a roasting pan and place the chicken on top of the stuffing, the chicken will be hot, be careful transferring the chicken.

Continue to roast for about an hour and a half, more or less, until juices run clear and an instant-read thermometer inserted into the thickest part of the thigh reaches 165 degrees. Let rest for 10 minutes before serving.
 

Sunday, October 31, 2010

Muffin-Pan Potato Gratins

It's been a real lazy weekend, and I was catching up on the pile of cookbooks and magazines in the pile near the couch. So I thought I would do the Great Cooking Magazine Challenge that Suzy from Kitchen Bouquet did a while back! Good motivation. I found a really easy recipe for potatoes in the new issue of Martha Stewart's Everyday Food that looked amazing! And did I mention easy? Really easy!


These were FANTASTIC! I used 1% milk instead of cream, because that's all I had and I don't think it made a bit of difference. The bottom sort of stuck to the nonstick pan, of course it did, that's my luck, so I ended up just re-stacking them with the top pieces that had browned. These "stackers" would be great for company or just as a side for the family! We really enjoyed these. A really great spur of the moment recipe that I will definitely be making again!


Muffin-Pan Potato Gratins
Source: Martha Stewart Everyday Food, November 2010
adapted There's Always Thyme to Cook 
Printable Recipe

2 medium-sized Russet Potatoes, very thinly sliced
6 tablespoons heavy cream (I used 1% milk)
coarse salt and freshly ground pepper

Preheat oven to 400°.

Lightly coat 6 standard muffin cups with unsalted butter. Place two slices of potato in each cup and season with salt and pepper. Continue to add potato slices, seasoning after a few slices, until the cups are filled. Pour 1 tablespoon heavy cream over each cup. Bake until potatoes are golden brown ad tender when pierced with a knife, about 30-35 minutes. Run a knife around each gratin. Place a baking sheet on top of the pan and invert to release the gratins. Flip right side up and serve.

 ~~~~~~~~~~~~~~~~~~~~~~~~~~~~~~~~~

Joining Mary's Mosaic Monday. For more mosaic's stop by the Little Red House!

Sunday, August 8, 2010

Magazine Challenge!


There's always a stack of cookbooks and magazines on the night table. Other people read novels. I read cookbooks and magazines. So when Suzy from Kitchen Bouquet decided to have a Magazine Challenge a while back, I jumped in with both spatula's!  She just posted another Great Cooking Magazine Challenge and I'm joining in again!

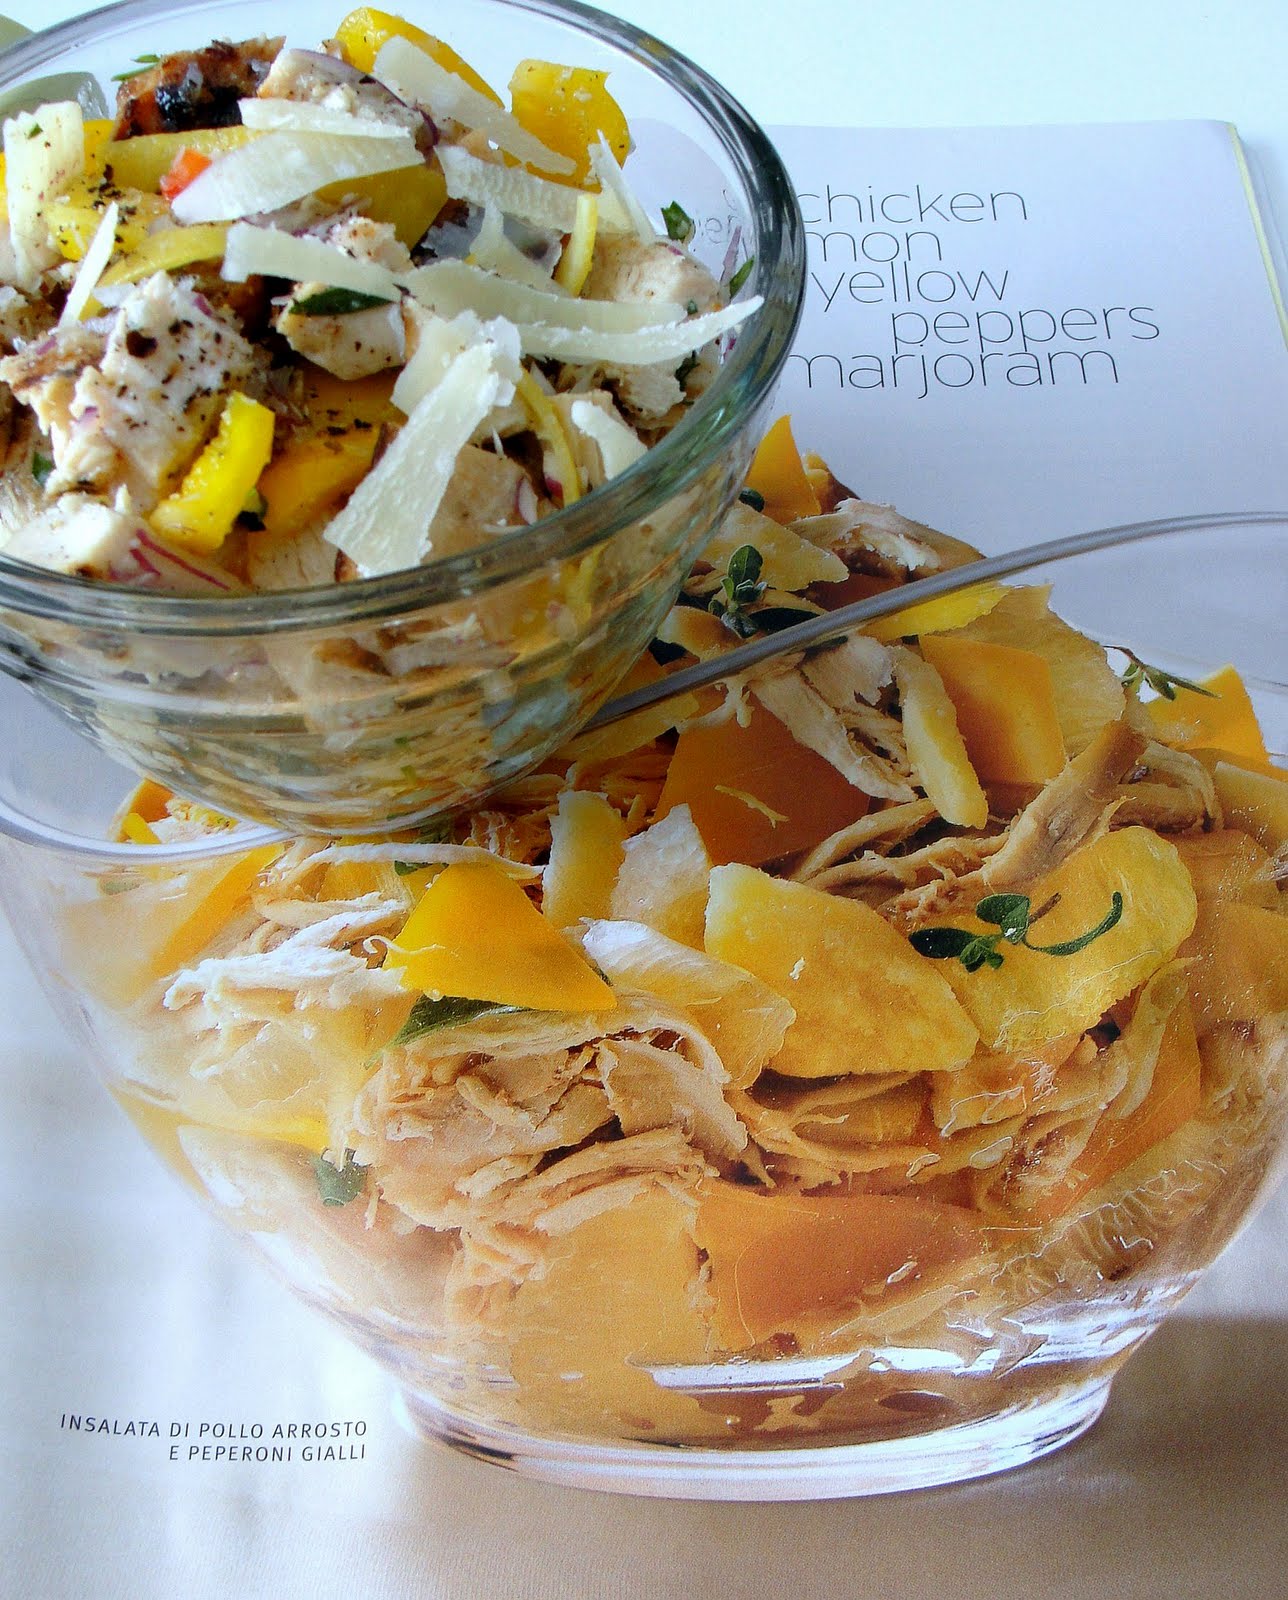
The August issue of La Cucina Italiana had a very easy recipe for a Chicken Salad. It looked great in the magazine. Great way to use up a leftover roast chicken, or a store bought rotisserie. But of course we didn't have roast chicken or a rotisserie chicken when I decided I had to have this for lunch. But lucky me, I did have grilled chicken strips leftover from Trader Joe's. The Picky One likes that for lunch sometimes in a salad, good to have on hand. It worked out great!  We loved this salad. This one is definitely a keeper!


Marjoram?  Not something I have lying around the spice cabinet, or out in the garden even! But I do happen to be growing tarragon, which I love. And oregano, which I like. I just happen to love fresh tarragon more!  So I assumed tarragon made a really nice sub! It did, but when I looked up marjoram, the site mentioned that fresh oregano is a good sub for it. So I put a little in as well.  I will look into growing marjoram next summer. I just happen to have a whole bunch of Meyer lemons in the freezer, so I grabbed a couple and thawed them in the microwave with a couple of 30 seconds bursts! Great way to always have a lemon or lime on hand is to freeze them whole and zap them in micro when you need one or two.


The salad was delicious, really bursting with a lot of flavor! I used a red bell pepper in addition to a yellow pepper to give it a little more color. Also threw in some diced red onion just because I love red onion in a salad.  The grilled chicken gave it a lot of flavor. And just an extra squeeze of lemon juice made the flavor really pop! Yep, making this one again for sure!


Chicken and Yellow Pepper Salad
(insalata di pollo arrosto e peperoni gialli)
Source: adapted from La Cucina Italiana, August 2010
Printable Recipe

2 lemons
zest of one of the lemons (strips)
2 cups small shreds of skinless roast or grilled chicken
1/2 small red onion, chopped in small dice
1 yellow and 1 red, or orange, bell pepper, cut into 3/4-inch cubes (2 peppers, any color!)
7 ounces (about 1 1/2 cups) Parmigiano-Reggiano or similar type cheese, cut into shards
4 tablespoons extra-virgin olive oil
3 tablespoons fresh tarragon leaves, and or marjoram, oregano, whatever you like
salt and freshly ground black pepper

Using a sharp paring knife, trim off top and bottom of lemons. Stand fruit on end and carefully cut the peel and white pith from flesh, reserve the peel, following curve of fruit from top to bottom. Trim away any remaining pith. Cut each section away from membranes, cutting as close to membranes as you can, then cut fruit pieces in half crosswise, and cut again in smaller pieces, and place in a large bowl. I squeezed a bit of the lemon juice into the bowl, too!

In the bowl with the lemons and zest, add the chicken, bell peppers, onion and cheese. Add oil, tarragon leaves and salt and pepper, to taste; toss to combine.


Thursday, December 17, 2009

Nine 30-minute Chicken Dinners

I was never much of a cook way back when, not that I couldn't, I just didn't. So why I sent away for Glamour magazine's cookbook, Glamour's Gourmet on the Run, all those years ago is a big mystery to me. I still have it. My first cookbook and I still occasionally try one of the Nine 30-minute Chicken Dinners from there. The book is from the late 1980's, way before Rachael Ray made 30-minute Dinners popular!

Tonight I was going to make our old favorite, Chicken Piccata. We have that a lot. It's really easy and Miss Picky loves it. Except now I follow Tyler Florence's recipe and add chicken broth to the Piccata. Instead of the same old, we tried the Sesame Chicken. I used Black Sesame seeds because that's all I had. I thought it looked nice with those, instead of white! and I didn't coat it, I sprinkled! Looks a little like black bugs, but it tasted great! I used more stock and more flavor makers, to make it more saucy!


Nine 30-minute Chicken Dinners

Source: Glamour Magazine, Gourmet on the Run
Printable Recipe

2 chicken breasts, skinless, boneless and pound to 1/4-inch thick (I use Perdue thin sliced chicken cutlets-skinless boneless)
1 tablespoon oil
1 tablespoon butter (I use all olive oil instead of the butter.)
2 tablespoons flour (way, way more than 2 tablespoons flour

Flavor Makers and Garnish

~~~~~~~~~~~~~~~~~~~~~~~~~~~~~~~~~~~~~~~~~~~~~~~~~~~~~~~~~~~
Before cooking, pound each cutlet between sheets of waxed paper until 1/4-inch thick. Don’t need to bother with this if you are using Perdue thin sliced cutlets or similar type of cutlets. Add just a cup or so of flour into a large Ziploc bag. Throw a bunch of chicken cutlets in, zip it and shake the bag until the cutlets are coated. Then fry the cutlets in a skillet in a couple tablespoons of olive oil and butter or all olive oil. Sauté the chicken until browned on both sides, then add the “flavor makers” to the pan. etc, follow the technique instructions. I double the sauces!

THE TECHNIQUE:
Dredge one whole chicken breast, skinned, boned, split in half and pounded, in 2 tablespoons flour. In medium skillet over medium-high heat, cook 1 tablespoon oil and 1 tablespoon butter or margarine until hot and foamy. Add chicken and saute until golden brown on both sides. Add the flavor makers. Cover and simmer until fork-tender, about 10 minutes. Remove chicken to plate and keep warm. Over medium-high heat, boil sauce in skillet rapidly until slightly thickened. Add finishing touches and heat through. Spoon sauce over chicken and add garnishes.
~~~~~~~~~~~~~~~~~~~~~~~~~~~~~~~~~~~~~~~~~~~~~~~~~~~~~~~~~~~

To make California Chicken

Flavor Makers - 1 cup sliced mushrooms, 3/4 cup dry white wine
Finishing Touch - 1/2 avocado, sliced
Garnish - chopped parsley

To make Chicken Milanese - * Instead of flour, dredge in seasoned breadcrumbs
Flavor Makers - 1 garlic clove, minced; 1/2 cup chicken broth; 1/4 cup white wine
Finishing Touch - 2 tablespoons chopped Parsley
Garnish - additional Parsley

To make Chicken Piccata
(I omit the garlic; add a little chicken broth, too!)
Flavor Makers - 1 garlic clove, minced; 1/2 cup white wine; 2 tablespoons lemon juice;
Finishing Touch - 2 tablespoons chopped Parsley
Garnish - Lemon slices

To make Yucatan Chicken

Flavor Makers - 1/2 cup lemon juice; 3 tablespoons raisins; 2 tablespoons canned chopped hot chilies
Finishing Touch - 1 tablespoon chopped fresh cilantro
Garnish - toasted pine nuts

To make Sante Fe Chicken
Flavor Makers - 1/2 cup red wine; 1/4 cup tomato puree; 3/4 teaspoon dried oregano; 1/2 teaspoon chili powder
Garnish - Lime wedges and sour cream

To make Provencal Chicken
Flavor Makers - 1/3 cup chopped onion; 1 teaspoon dried basil, 3/4 cup white wine
Finishing Touch - 1/2 cup chopped, canned tomatoes; 1/4 cup black olives, chopped
Garnish - Chopped parsley or fresh basil

To make Sesame Chicken 
Mix 1 egg with 2 tablespoons milk. After dredging in flour, dip chicken into egg mixture, then coat with 3 tablespoons sesame seeds.
Flavor Makers - 3/4 cup chicken broth; 1/2 teaspoon soy sauce; 1/2 teaspoon grated fresh ginger; 1 garlic clove, minced; 1/4 teaspoon sesame oil; 1/8 teaspoon crushed red pepper flakes
Garnish - chopped parsley or cilantro

To make Chicken with Peppers
Flavor Makers - 1/4 cup diced, cooked ham; 1/4 cup chopped onion; 1/2 cup white wine; 1/4 red pepper, cut into slivers; 1/4 green pepper, cut into slivers; 1/4 teaspoon dried thyme leaves
Garnish - chopped parsley

Sunday, May 24, 2009

A Double Magazine Challenge!


Always up for a challenge, this time I managed to find two new recipes from the huge stack of magazines that are piling up on the night table. Suzy at Kitchen Bouquet started this challenge for herself and I loved the idea so I jumped in more than a few posts ago! Click here for her Challenge posts! I think my biggest challenge isn't so much finding a recipe but more FOLLOWING the recipe! Distractions always get in the way!

From Gourmet's recent issue, I made Peach-Lacquered Chicken Wings. The wings came out great, sweet and sticky, next time I'd even more pepper than I threw in. I changed it up a little, I roasted the wings at 400 for about 20 minutes or so, and basted once with the sauce. Then when the wings were pretty much cooked through, I drained the pan and then broiled to crisp it up, basting and then turning the wings and basting again. Twice. Until it got crispy and sticky. Much easier than standing over the broiler for twenty minutes. My smoke alarm appreciated the change in the recipe!

Just out the broiler, perfectly charred! You have to watch these things. The smoke alarm kept me posted!


They actually came out perfect. The burning was from the sauce in the pan. and maybe one or two or four of the wings! Do you think I'd show a picture of the extremely burned ones? Definitely a keeper recipe. Another easy one.

Peach-Lacquered Chicken Wings
Recipe by Melissa Roberts
Gourmet, June 2009
Printable Recipe

3 garlic cloves
1 (3-inch) piece peeled ginger, coarsely chopped
2/3 cup peach or apricot preserves or jam
1/3 cup soy sauce
2 tablespoons water
1/4 teaspoon hot red-pepper flakes (I used more!)
4 lb chicken wings, tips removed if desired

Preheat broiler.

With motor running, drop garlic into a food processor and finely chop. Add ginger and finely chop.

Add preserves, soy sauce, water, and red-pepper flakes and pulse until sauce is combined.
Line bottom and sides of a large 4-sided sheet pan with foil and lightly oil foil.
Pat wings dry and put in sheet pan. Season with 3/4 teaspoon salt. Pour sauce over wings and toss to coat, then spread in 1 layer.

Broil wings 4 to 6 inches from heat 5 minutes, then turn over and baste with sauce from pan. Continue to broil, rotating pan and turning and basting 3 more times, until chicken is cooked through and browned in spots, 20 to 25 minutes.

and for the side dish, Rösti Potatoes from Food& Wine seemed easy enough. It's a Swiss-style potato pancake. Reminded me of a giant latke without the onions. So I got out my trusty food processor and the cast iron pan and I was all set. Except I had no baking potatoes. I had a ton of fingerlings, so why not. Being lazy, I never peeled them, and just grated away in the food processor. I assumed the pan was hot enough. Never assume. So big deal, I turned the heat up. It was beginning to look a little grayish. I tried to slide it out of the pan onto a plate so I could fry the other side. It stuck. I manged to get it back in the pan. So maybe I will call my potatoes, Sloppy Rösti's! They sure did taste good, even if they weren't pretty!


Rösti Potatoes
Recipe by Francis Mallmann
Food & Wine, June 2009
Printable Recipe

2 1/2 pounds baking potatoes, scrubbed
Extra-virgin olive oil, for frying
Salt

Heat a large griddle over moderately low heat or on a preheated grill. On a work surface, using a box grater, coarsely shred the potatoes into 10 fluffy piles—don’t pat the piles down.

Add 1/8 inch of oil to the griddle and heat until shimmering. Carefully transfer the potato piles to the griddle, keeping them fluffy and evenly spaced. Season with salt. Cook over moderately low heat until well-browned and crisp on the bottom, 15 minutes. Turn the piles, adding another 1/8 inch of oil to the griddle. Cook for 15 minutes longer, until the potatoes are browned and crisp; season with salt and serve.

Make Ahead:
The rösti potatoes can be fried 2 hours in advance. Reheat before serving.

Tuesday, April 14, 2009

Suzy's Magazine Challenge...

and my pile for April is dwindling by the night table! but the mailman just brought some new issues for May!


I love Suzy's Great Cooking Magazine Challenge at Kitchen Bouquet. Gives me incentive to go through the pile and we get to try some new recipes in the process!

This one is from Martha Stewart Living, May 2009 issue. Excellent recipe. Didn't change a thing, didn't burn it or screw it up either :) I used white button and cremini mushrooms, what I had on hand. Made two pounds, lots of flavor! Tasted them hot from the oven. Served them warm! Both great. Definitely a do over!


Roasted Mushrooms
Chris Bianco, Martha Stewart Living, May 2009

1 pound mushrooms, preferably royal trumpet, cut lengthwise into 3/4-inch slices
3 ounces 1/4-inch-thick pancetta, cut into 1/4-inch-by-1-inch pieces
4 fresh or dried bay leaves
3 garlic cloves, smashed, or 2 green garlic, thinly sliced crosswise
Pinch of red-pepper flakes
3 stems fresh rosemary
1/4 cup extra-virgin olive oil
Fine sea salt and freshly ground pepper
1/2 cup dry white wine
1/4 cup fresh flat-leaf parsley
1 tablespoon julienned lemon zest

Preheat oven to 500 degrees. Spread mushrooms on a rimmed baking sheet. Sprinkle with pancetta, bay leaves, garlic, red-pepper flakes, and rosemary. Drizzle with oil, and season with salt and pepper. Roast, rotating sheet halfway through, until golden brown around edges, about 20 minutes.

Spoon off excess fat. Add wine and stir. Roast until wine has almost evaporated, about 5 minutes more.

Toss with parsley and zest. Serve hot, warm, or at room temperature.

This a recipe I've mentioned before that we love. Sticky, sweet and as hot as you like it! Cherry Cola BBQ glaze, 3 ways! We like choices here. One kid doesn't eat the ribs or the steak, one kid likes all three. Everyone's happy this way. A little bit of something for everyone and leftovers for lunch the next day! Except me, I wanted takeout so I wouldn't have to clean up!


The recipe for the Cherry Cola BBQ Glaze can be found here or here!


We used to bring new meaning to flame broiling. The buzz word being FLAME! but now I cheat and precook the wings and ribs in the oven first. Then finish on the grill. On medium heat! Since we figured out precooking and lower heat on the grill, we haven't been eating incinerated chicken wings in a very long time.


On the side we had a really good and spicy black bean and corn salsa, I got it a while ago on the Cooking Forum at gardenweb. Spicy, smoky, hot. Great flavor. Always gets raves! For the heat wimps used less chipotle!


Spicy Black Bean Salsa
Source: Cooking Forum, posted Lorijean
Printable Recipe

1/4 cup fresh lime juice
1/4 cup chopped fresh cilantro
2 tablespoons olive oil
4 teaspoons minced canned chipotle chiles
1 tablespoon red wine vinegar
1 teaspoon ground cumin
1 15- to 16-ounce cans black beans, rinsed, drained
1-1/2 cups fresh corn kernels, blanched, or frozen corn kernels, thawed
1-1/2 cups chopped red onion
1-1/2 cups chopped tomatoes (about 3 medium)
1 cup chopped green bell pepper
1 large ripe avocado, halved, pitted, peeled, diced
Tortilla chips

Whisk first 6 ingredient in large bowl to blend. Stir in beans, corn, onion, tomatoes, and bell pepper. Mix in avocado; season to taste with salt and pepper. Can be prepared 2 hours ahead. Cover and refrigerate.

Tonight's dinner is anyone's guess!

Sunday, April 5, 2009

A nice easy dinner for a nice Spring day...


Remember the magazine challenge from Suzy at Kitchen Bouquet from last week? Maybe two weeks ago? I really like that challenge. I have tons of magazines with dog-eared pages and post-its coming out the top! Time to try another magazine recipe! We did the grocery shopping early and of course had another list two hours later after I looked at that pile of magazines. Had my heart set on this Greek style recipe from the March issue Gourmet. Chicken Gyro's with Cucumber Salsa and Tsatsiki. Awesome! Searched through epicurious to find a soup to go with it. Found an easy Avgolemono that was good, just needed some tweaking! It needed way more than 3 tablespoons of lemon juice, I thought. So I added more!


Avgolemono Soup
by Victoria Granof (Cookie, April 2009, Epicurious.com)

4 cups chicken broth
1/4 cup uncooked orzo (or rice or pastina)
Salt and pepper to taste
3 eggs
3 tablespoons lemon juice

In a large saucepan, bring the broth to a boil.

Add the orzo, rice, or pastina and cook until tender but still al dente, about 7 minutes (20, if using rice). Season with the salt and pepper and reduce heat to low; simmer.

Meanwhile, in a medium bowl, whisk together the eggs and lemon juice until smooth.

Ladle about 1 cup of the hot broth into the egg-and-lemon mixture, then whisk to combine.

Add the mixture back to the simmering saucepan. Stir just until the soup becomes opaque and thickens as the eggs cook, 1 to 2 minutes. Add more salt and pepper, if desired, and serve.

~~~~~~~~~~~~~~~~~~~~~~~~~~~~~~~~~~~

The gyro's were a really big hit! I used a rotisserie chicken from the supermarket. We all loved them. Big, big hit! I used pocketless pitas, whole wheat. Pretty much my only change was toadd a splash of red wine vinegar to the salsa. No one else likes Tsatsiki, but I do and it was a nice recipe. I just added a little more lemon. Everyone else slopped their gyro's with hummus from Trader Joe's! The whole thing took almost no time to prepare, and it will definitely be on the table again and again.


Chicken Gyros with Cucumber Salsa and Tsatsiki
by Kay Chun (Gourmet, March 2009)

2 Kirby cucumbers, divided
1 1/2 cups Greek yogurt (3/4 pounds)
1 teaspoon fresh lemon juice, divided
5 garlic cloves, minced, divided
1 pint grape tomatoes, quartered
1 small red onion, halved and thinly sliced
1/3 cup chopped flat-leaf parsley
1/4 cup chopped mint
1/4 cup extra-virgin olive oil
1 rounded teaspoon dried oregano
1 rounded teaspoon dried rosemary, crumbled
1 (12-ounces) package naan bread (four 8-inch pieces)
or 4 (8-inch) pocketless pita rounds
1/2 roast chicken, skin discarded, meat shredded (about 2 1/4 cups), and carcass reserved for stock
1/2 head iceberg lettuce, thinly sliced

Preheat broiler.

Peel and grate 1 cucumber, then squeeze it with your hands to remove excess water. Stir together with yogurt, 1/2 teaspoon lemon juice, one third of garlic, and 1/4 teaspoon each of salt and pepper to make tsatsiki.

Cut remaining cucumber into 1/4-inch pieces and stir together with tomatoes, onion, parsley, mint, remaining 1/2 teaspoon lemon juice, and 1/4 teaspoon each of salt and pepper to make salsa.

Gently simmer oil, oregano, rosemary, remaining garlic, 1/4 teaspoon salt, and 1/8 teaspoon pepper in a small heavy saucepan, stirring constantly, until garlic is fragrant but not browned, 1 to 2 minutes. Toss chicken with 3 tablespoons garlic oil and brush one side of bread with remainder.

Heat bread, oiled side up, in a 4-sided sheet pan, covered with foil, 3 to 4 inches from broiler 3 minutes. Uncover and broil, rotating bread for even coloring, until golden in spots, about 2 minutes.

Spread some of tsatsiki on warm bread and top with chicken and some of lettuce and salsa. Serve remaining lettuce, salsa, and tsatsiki on the side.


Slice and bake sugar cookies for dessert! Rolled in sprinkles. Overbaked but not burned. I'm getting there. Sort of!


and today was a really nice Spring day! Tomorrow it's rain. and probably a restaurant! Maybe next week a cookbook challenge. I have hundreds of those. Not far from the magazine pile.

Sunday, March 29, 2009

Busy day in the kitchen!

Getting ready for the holidays, it was a busy day in the kitchen today. Had to make something for lunch and Suzy at Kitchen Bouquet was having a Cooking Magazine challenge. Had to wait for hours for the briskets and the chicken soup to cook, so I figured why not? Here we go...


From Eat Smart with Ellie Krieger from Fine Cooking magazine, Tomato Stuffed Peppers. These were delicious! I sprinkled some extra kalamata olives on top, but they got a little burned. Otherwise, came out perfect. I used yellow and red tomatoes, orange and red peppers! These are definitely going to be made again! Really good. The magazine was a gift from a friend. Good friend :) The recipe is also on the Food Network site.


Tomato Stuffed Peppers
recipe by Ellie Krieger

Cooking spray
4 large red peppers
2 cloves garlic, thinly sliced
3 tablespoons chopped kalamata olives
4 medium tomatoes
2 tablespoons olive oil
Freshly ground black pepper

Preheat oven to 375 degrees F. Spray a large, shallow baking dish with cooking spray.

Cut the peppers in half lengthwise, removing the seeds but leaving the stem. Although the stem is not edible it looks good in this dish and helps the pepper retain its shape. Place the peppers cut side up in the baking dish.

Divide the sliced garlic and the olives evenly among the peppers. Cut each tomato into 8 wedges and put 4 wedges into each pepper. Drizzle each stuffed pepper with a little oil and season with a few grinds of pepper.

Roast the peppers for about 50 minutes or until they are tender and beginning to brown around the edges.

Back to top