Showing posts with label Breads. Show all posts

Wednesday, April 24, 2013

Mac n Cheese...

I finally made a decent batch of mac n cheese. After quiet a few flops. You can use light cheese in this recipe from the April issue of Cooking Light. I used whatever I had on hand. No light cheeses. It came out great. We finally enjoyed a nice bowl of creamy mac n cheese. Finally.

Although compared to this one from way back, anything is an improvement :)
We needed to actually scrape it off the plate.


 But this one was light, creamy and cheesy. Perfect. and it had a nice toasted bread crumb topping.


Easy Mac and Cheese
original recipe from Cooking Light, April 2013

1 box elbow macaroni
2 cups 1% low-fat milk
3 tablespoons all-purpose flour
1/2 teaspoon black pepper
dash of ground red pepper
3/4 cup Velveeta cheese, cut in chunks, or shredded
2/3 cup extra-sharp cheddar cheese, shredded
1/4 teaspoon kosher salt, more or less to taste
1/4 cup fresh breadcrumbs (I used brioche)

Preheat broiler.

Cook pasta according to package directions; drain.

While the pasta cooks, combine milk, flour, and red and black peppers in a saucepan, stirring with a whisk. Bring to a boil; keep stirring, cook until thick, about 4 minutes. Remove from heat.

Add cheeses and salt; stir until smooth. Add pasta, and stir to coat. Spoon mixture into a baking dish. Sprinkle breadcrumbs evenly over top; broil 2 minutes or until browned. Watch carefully so the breadcrumbs don't burn.

Thursday, April 11, 2013

Shrimp Scampi

It's been a while but I'm back with more seafood. After not having it for so long, I'm really enjoying making up for lost time. This one was super easy and really good. You can serve it over pasta or not. We loved it over spaghetti. I didn't exactly follow the recipe, no kidding :) and you have to watch the breadcrumbs under the broiler, it was real close to setting off the smoke alarm. But I was actually paying attention this time. I will definitely be making this one again. And again.

Sorry for the comment moderation, the spammers seem to be typing overtime these days.


Shrimp Scampi

1 package of spaghetti or linguine
3 tablespoons unsalted butter
8 cloves garlic, minced
18 jumbo shrimp, peeled and deveined
juice of 2 lemons
1/4 cup Sauvignon Blanc or other white wine
1/4 cup chicken broth
1/2 teaspoon paprika
1/4 seasoned breadcrumbs, store bought or homemade (I used seasoned panko)
3 tablespoons olive oil
salt and freshly ground black pepper
pinch of red pepper flakes

Preheat broiler.

Prepare spaghetti according to package directions.

Melt butter in an ovenproof skillet over medium heat. Add garlic and cook, stirring, until it start to get some color, about 3 minutes. Add shrimp and cook until well coated with butter and garlic, about 2 minutes. Add lemon juice, wine, red pepper and broth; bring to a boil. Season with salt and pepper to taste. Cover, reduce heat, and let simmer for another 2 minutes.

Uncover; sprinkle shrimp with paprika. Transfer the skillet to broiler and broil until shrimp are cooked through, about 5 - 6 minutes. Remove skillet from broiler, top with breadcrumbs and drizzle with olive oil. Return skillet to broiler and broil until breadcrumbs are golden brown, about 2 minutes. Keep an eye so it doesn't burn. Toss with spaghetti and serve.

Monday, March 11, 2013

Pan-Roasted Bay Scallops

Finally back after a little break. More than a little break, time really flew. Hoping to get in more blogging, more cooking and more blog visits. It's been a hectic few months,  a long crazy winter and we're really looking forward to some nice Spring weather. At least the kind that brings flowers instead of 60 degrees one day and a blizzard the next.

 We have to replace a lot of our landscaping in the front of our house because of the flooding from the hurricane and it will be really nice to finally see green and some color other than brown grass and crispy leaves this Spring. Today the gardener came to remove some of the trees and shrubs. New sod soon. Sinkholes were filled in. Things are coming along.  We were so lucky, considering.

And I have been making up for lost time with the shellfish allergy. Really making up time. I am still not sick of lobster, shrimp or clams. Although the family probably is by now. 

Tonight was Bay Scallops.  Pan-roasted. And so good.

It's really good to be back posting, and good to be cooking again. Starting to get tired of take-out. 

Hope you all are doing well :)


Pan-Roasted Bay Scallops with Bread Crumbs and Lemon

2 tablespoons unsalted butter
1/2 cup fresh bread crumbs, preferably from brioche or challah
salt and freshly ground pepper
1 tablespoon olive oil
1 1/2 pounds bay scallops
1 large shallot, thinly sliced
1 small Meyer lemon
1/4 cup white wine, Sauvignon Blanc
1 tablespoon chopped parsley

In a large skillet, melt one tablespoon of butter. Add the bread crumbs, season with salt and pepper and cook over moderate heat, stirring so the crumbs don't burn, about 3-4 minutes. When the crumbs are golden brown and crisped, remove them to a plate.

Wipe out the skillet. Add the oil and heat on high until it shimmers. Add half a tablespoon of the butter and let it melt. Add the scallops, season with salt and pepper and brown, about 2 minutes.

Add the shallots and the remaining butter in the skillet.  Add the juice of a small Meyer lemon and the white wine. Cook over moderate heat until the liquid has reduced, about 4 minutes.

Check for seasoning. Remove from the heat and stir in the parsley. Sprinkle the toasted bread crumbs on the plates, add scallops on top of the crumbs and serve.


I'm joining


Thursday, July 26, 2012

Gazpacho


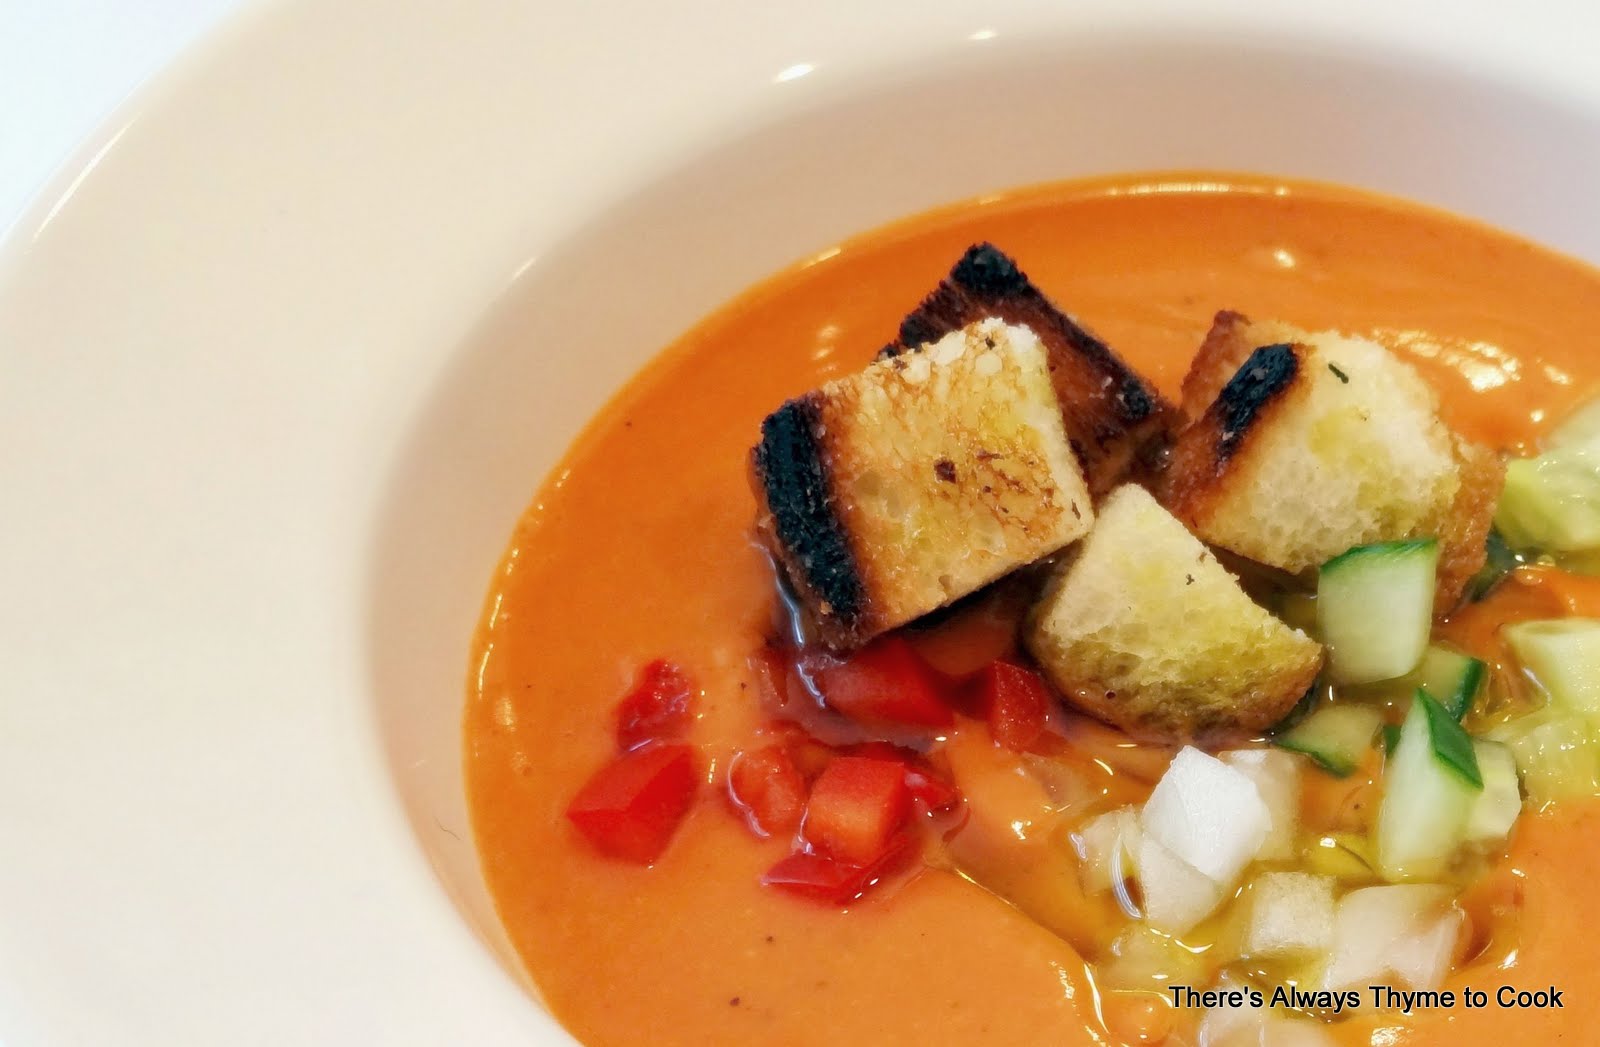
Hot weather calls for cold soup! Not really, I like soup any time, hot or cold. I've had gazpacho before but not like this one. I saw it in this month's Fine Cooking and it looked so good, so creamy, I had to try it.

I didn't notice that the recipe said a pinch or two of cumin, so I added about 2 teaspoons. Fresh cilantro isn't big around here so I added some ground coriander and threw in some ancho chili for good measure. Used more bread than was called for and didn't notice about trimming the crust for croutons. Didn't notice the croutons were burning until it was a tad too late. They were still good. Extra flavor :)

It turns out the family is not so keen on cold soup. My husband thought it tasted like a creamy salad dressing. The kids and their friends gave it an "okay" but I really loved it. Loved. And it's easy enough to make some just for myself.

The flavor was so good. I think my family just assumes that soup should be hot. I'm always in a rush when I serve so you'd think they'd be used to cold soup. Or maybe the fact that this was intentionally cold soup. They'd have been happier with the usual lukewarm. ah well, more for me. 

Today's lunch!

See how creamy it looks? But no cream at all.


Gazpacho

1-3/4 lb. ripe tomatoes, cored and coarsely chopped (about 5 cups)
1/2 medium green bell pepper, stemmed, seeded, and coarsely chopped (3/4 cup)
1/2 small red bell pepper, stemmed, seeded, and coarsely chopped (1/2 cup)
1/2 cup packed torn fresh bread, such as a soft baguette, Portuguese roll, or thick white sandwich bread, plus enough for 1/4 cup of 1/2-inch cubes for croutons. I used a soft Italian bread
9 tablespoons good-quality extra-virgin olive oil; plus more for croutons and drizzling
2 teaspoons sherry vinegar
2 small cloves garlic
kosher salt and freshly ground pepper, to taste
1-2 teaspoons ground cumin (more or less to taste)
1-2 teaspoons ground coriander (more or less to taste)
1 teaspoon ancho chili
optional garnish - chopped cucumbers, red peppers and onions

Put the tomatoes, bell peppers, bread, olive oil, the vinegar, garlic, about a teaspoon salt, pepper, chili, coriander and cumin in a blender. Pulse until coarsely puréed, then blend until very smooth, about 5-6 minutes or more if needed (it may be a bit frothy). Season to taste with salt and pepper. Refrigerate until very cold, at least 1 hour.

Meanwhile, heat about 3 tablespoons olive oil in a skillet over medium heat. When the oil gets hot, add the bread cubes. Cook, stirring frequently, until golden brown all over, about  minute or two. Sprinkle with a little salt. Transfer the croutons to paper towels to drain and cool.

Taste the gazpacho just before serving and adjust the seasonings as needed. Serve cold,  drizzle with oil and garnished with the chopped red pepper, cucumber and the croutons.

Make Ahead: The gazpacho can be made up to 2 days ahead and refrigerated.


I'm joining
Every weekend. It's open to anyone who has any kind of food-related post to share! Go on over and see some fun posts.


Thursday, May 10, 2012

Baked Fish with Fresh Herbs and Bread Crumbs

We were watching America's Test Kitchen over the weekend, even my husband likes this show. They were making fish, which is slowly creeping into our diet more often. Looked so good, he went out to find some sole so I could make it for dinner that night. No sole, so he came home with Tilapia. A little thick, but I managed to make rolls that didn't look too bad, except it took a little longer to cook. A lot longer. But it was good. My family has become fish converts. Except for Miss Picky. She won't touch it. Can't win em all.


Baked Fish with Fresh Herbs and Bread Crumbs
adapted by There's Always Thyme to Cook
Source: http://www.americastestkitchen.com
Printable Recipe

2 tablespoons minced fresh parsley leaves
2 tablespoons minced fresh chives
2 tablespoons minced fresh tarragon leaves
finely grated zest from 1 lemon
juice of the zested lemon
5 tablespoons unsalted butter, cut into pieces
3 medium garlic cloves, minced or pressed through garlic press (about 2 teaspoons)
6 sole or flounder fillets (boneless and skinless, use fresh, not frozen) or tilapia
kosher salt and ground black pepper
1 tablespoon Dijon mustard
2/3 cup panko bread crumbs
lemon wedges, for serving

toothpicks, to hold the fish roll closed if you use tilapia

Preheat oven to 350 degrees.

Combine parsley, chives, and tarragon in small bowl. Reserve 1 tablespoon of the herb mixture and set aside for bread crumbs. Stir lemon zest into remaining herbs.

Heat 4 tablespoons butter in a small skillet over medium heat until just melted. Add 2 teaspoons minced garlic and cook, stirring frequently, until fragrant, about 2 minutes. Set skillet aside off heat.

Pat fillets dry with paper towels. Season both sides with salt and pepper. Turn fillets skinned side up with tail end pointing away from you. Spread 1/2 teaspoon mustard on each fillet, sprinkle each with about 1 tablespoon herb–lemon zest mixture, and drizzle each with fillet with about 1 1/2 teaspoons garlic butter. Tightly roll fillets from the thick end to form rolls. Set fillets seam side down in 13 by 9-inch baking dish. Squeeze the lemon juice over each fillet. If using a thicker fish like Tilapia, use toothpicks to skewer them closed. Drizzle remaining garlic butter over fillets, cover baking dish with aluminum foil, and bake 30 minutes.

Add remaining tablespoon of butter to the skillet and melt over medium heat. Add panko and cook, stirring frequently, until crumbs are deep golden brown, 5 to 8 minutes. Reduce heat to low, add remaining teaspoon minced garlic, and cook, stirring constantly, until garlic is fragrant and evenly distributed in crumbs, about 1 to 2 minutes. Transfer to small bowl, stir in salt and pepper to taste. Let it cool. When it's cooled, stir in the reserved herb mixture.

After fillets have baked about 30 minutes, remove the baking dish from the oven. Baste fillets with the garlic butter from baking dish, sprinkle with all but 3 tablespoons bread crumbs, and continue to bake, uncovered, until internal temperature registers about 135 degrees on instant-read thermometer, about 10 minutes longer. Using a thin spatula, transfer fillets to individual plates, squeeze a little lemon juice over the fish, drizzle with any melted butter left in the dish, sprinkle with remaining bread crumbs, and serve with lemon wedges. Make sure you remember to TAKE THE TOOTHPICKS OUT, if using!


Joining 
 Beth at Beth Fish Reads for her fun Weekend Cooking Party. Every weekend. It's open to anyone who has any kind of food-related post to share! Go on over and see some fun posts.
 

AND


Monday, December 26, 2011

Simpler Times French Toast Casserole

Overnight French Toast casserole is a favorite in our house. Especially this one. Simpler Times Blueberry French Toast Casserole. Always a request from my son and his friends, especially when they were back on break from college. But planning ahead is not really my thing, or theirs, so we sort of skipped the overnight part and gave it abut an hour for the bread to soak up the custard. A little mash and stir helps that along and even with just half an hour to soak, it comes out perfect. This time I even went for the real bacon and not the pre-cooked. No comparison! A pretty perfect breakfast. Tomorrow it's back to the cheerio's!


Simpler Times French Toast
Source: David/ Lakeguy (GW Cooking Forum), original recipe by Chef & Innkeeper Cindy Belford, Simpler Times Inn
adapted by There's Always Thyme to Cook
Printable Recipe

1 whole Challah or Brioche cut in 1" cubes
5 eggs
1/2 cup sugar (original recipe called for 1 cup, I used 1/2 cup)
1 teaspoon nutmeg
3 cups milk or half & half
3 cups fresh or frozen blueberries
1 cup chopped pecans
1/4 cup butter
1/2 cup brown sugar

Put bread cubes in large bowl. Whip eggs, sugar and nutmeg until light in color and thick. Add milk, stir and pour over bread. Cover and place in fridge overnight, if you can't make it ahead, let it soak for at least an hour and mix the bread well in the custard mixture.

In the morning, mix 1 cup blueberries and 1/2 cup pecans into the bread mix and put into a greased pan; sprinkle rest of the blueberries on top, then the pecans. In pan, melt butter and brown sugar until bubbly. Pour mixture over blueberries and pecans.

Bake at 325 degrees for one hour or until puffed. Serve hot with syrup.


Joining

Thursday, June 16, 2011

Celebrity Cook-along: Pillsbury Doughboy

This time we're cooking with the Pillsbury Doughboy!


The Griller was out doing errands the other day when I called him up to get me a tube of Pillsbury Crescent rolls. He's a good guy, picked them up for me and I threw the tube in the frig. It's a blue tube, it said Pillsbury, I assumed it was fine. I'm thinking chocolate croissants with this tube of flaky, greasy goodness, no matter I can't pronounce some of the ingredients, they make excellent chocolate croissants.

These will not make good chocolate croissants. He got the wrong blue tube. I don't like garlic with my chocolate. They did however, make fantastic Ranchero Crescent Rounds. Little Southwestern Black Bean and Cheese Quiches. Except these had an Asian flair because we love Sriracha.


and since they weren't round, I managed to deal with that, too...


They came out so good! Topped with a little fire-roasted salsa, I intended them for an afternoon snack, my kids are starving after school, milk and cookies would never do. Instead they had them for breakfast, they couldn't wait. My kids are not breakfast cereal kids for breakfast, you have to be inventive.


The changes I made were by accident, I never read the complete directions, no shock there! I only used one can, they weren't the rounds and I filled to the top instead of a tablespoon of filling. Instead of slicing them into the rounds (I didn't read that part!) I unrolled it and used a glass. It worked out fine, except I had leftover scraps, which I baked plain. They were good plain. In a standard six muffin pan, it made nice sized little quiches. Would definitely make these again! They would also be very nice for a brunch.


Rancheros Crescent Rounds
Source: Pillsbury.com - recipe by Amy Murphy Bake-Off® Contest 44, 2010
Adapted by There's Always Thyme to Cook
Printable Recipe

2 cans (8 oz each) Pillsbury® Place ’N Bake® refrigerated crescent rounds (16 rounds) or 2 cans (8 oz each) Pillsbury® refrigerated crescent dinner rolls
1 egg
2 tablespoons sour cream
1/4 teaspoon salt
1/8 teaspoon black pepper
1/4 teaspoon chili powder
1/4 teaspoon red pepper sauce (I used a teaspoon of Sriracha Sauce)
1/2 cup shredded sharp Cheddar cheese (2 oz)
1/3 cup canned black beans, drained, rinsed
1/4 cup salsa

Heat oven to 375°F. If using crescent rounds, remove from package, separate into 16 rounds. If using crescent rolls, remove from package, but do not unroll. Using serrated knife, cut each roll into 8 rounds; carefully separate rounds. Place rounds on ungreased large cookie sheet. Press down center and pinch edge of each round to make indentation (about 3/4 inch deep and 2 inches in diameter).

In small bowl, beat egg, sour cream, salt, pepper, chili powder, pepper sauce and 1/4 cup of the cheese with fork or wire whisk until well blended.

Place 1 teaspoon of the beans in each crescent bowl. Spoon 1 teaspoon egg mixture into each bowl (do not fill to top). Sprinkle each with about 1 teaspoon of the remaining cheese.

Bake 14 to 18 minutes or until bowls are golden brown and filling is set. Top each with 1/2 teaspoon of the salsa.


Joining


Sunday, March 6, 2011

Pizza!

Homemade pizza is so easy, even if you aren't the greatest baker. I use a really easy recipe for the dough that I played around with when I used to be a baking counselor at summer camp. We baked pizza with the kids. Funny, there was more flour on the kids than in the pizza! The crazy thing is, they had me baking with the kids, and I can't really bake. But even I couldn't screw it up. Much :) Finally got it right and now I make homemade for my family any time they want it. Sometimes if I'm really in lazy mode, we just get the dough from the pizza place. And if something comes up and you can't get to it, the dough freezes perfectly fine to use another time.

So today we decided on two kinds, but since everyone is picky when it comes to pizza, we all get a section. One is basic, a tomato, mozzarella and ricotta! With a little Parmesan sprinkled in with the mozzarella. The other is the picky pizza. Some like onions, some like peppers, some no onions, no peppers! So one got half pepper, half onion and everybody here likes mushrooms!

So what's your favorite?


Tomato, Mozzarella and Ricotta


Yellow Pepper, Red Onion, Mozzarella and Mushroom


Pizza Dough
Source: internet recipes
adapted There's Always Thyme to Cook
Printable Recipe

This is a basic recipe adapted from many on the internet!
3 cups flour
1 active dry yeast
1/4 teaspoon salt
1 cup warm water
2 tablespoons oil

For dough, beat together on low speed or by hand, half of the flour, the yeast, salt, warm water, and oil for 30 seconds, scraping bowl constantly. Then beat on high for another 3 minutes. Turn out the dough on a clean, floured surface. Gradually add the rest of the flour and knead dough for about 7 minutes until elastic. Place the dough in a bowl, cover, and let rise for 45 minutes.


Joining Mary's Mosaic Monday. For more mosaic's stop by the Little Red House!


Back to top