Showing posts with label Dinner. Show all posts

Thursday, April 7, 2011

Weekend Cooking: The Whole Enchilada!

This is one of our favorites. Beef Enchilada's!
Served with a side of refried beans and Mexican rice.

As you can tell, we like it or maybe we are just getting used to it, being cooked a tad longer than the recipe states.  Just a tad :)


It really is perfectly done and very saucy on the inside. Cheesy gooey on the outside.


Beef Enchiladas
Printable Recipe

Enchilada Sauce:
2 tablespoons oil
2 tablespoons minced garlic
3 cups water
1 15-ounce can tomato sauce
2 - 4 tablespoons chili powder
1/4 teaspoon salt
2 teaspoons cumin
4 ounces diced green chiles -- drained
2 teaspoons oregano
canned jalapeno rings (optional)

Beef Filling:
1 large onion -- chopped
1 - 2 pounds ground beef chili powder

10 8-inch flour tortillas (or 8 10-inch)
1 1/2 cups shredded Cheddar cheese
1 1/2 cups shredded Monterey Jack cheese

To prepare enchilada sauce, in medium saucepan, combine sauce ingredients. Simmer 30 minutes.

To prepare beef filling, in large skillet, cook ground beef, onion and additional chili powder. Drain off the excess fat. Add 3/4 cup enchilada sauce to meat and cook low 10 minutes or until sauce absorbed.

To assemble enchiladas, in un-greased skillet, heat each tortilla low heat, about 15 seconds per side, dip in sauce, fill with 2 tablespoons beef filling, sprinkle some of the cheese on top of the meat and roll up. Place seam side down in 12 x 8 inch baking dish. Cover enchiladas with remaining sauce. Sprinkle with cheeses, top with some jalapeno rings if you are using them, and bake uncovered at 350 for 30 minutes.


Joining Beth at Beth Fish Reads for her fun Weekend Cooking Party. Every weekend. It's open to anyone who has any kind of food-related post to share! Go on over and see some fun posts.


Saturday, March 5, 2011

Pulled Pork Sandwiches

Sometimes even the most predictable people can fool you big time. You could have picked me up off the floor the day Miss Picky came home from a friend's house, and wanted pulled pork. They were having pulled pork for dinner and she insisted that I make pulled pork for her. WHAT? Did I hear right? Pulled pork? I love that stuff. But I've only had it at BBQ joints. Never homemade. I thought it might be difficult, but for my Miss Picky, I'd find a good recipe. I knew everyone else would like it, but Miss Picky is a definite challenge when it comes to food.

I looked through tons and tons of recipes. Some had too many steps, some involved smoking. I wanted easy. I needed easy, really easy! Martha Stewart had just what I wanted. I could do this. And so can anyone. Miss Picky loved it. We all did. Except for one little thing, next time she wants the all the sauce mixed in with the pork, not poured over it! Still, we're making progress!  If only she'll come home one day and insist on a piece of grilled salmon or something!


Pulled Pork with a side of Chipotle Sweet Potato Fries and Cole Slaw.
Someone couldn't wait to eat before the picture was taken. Snuck a bite! It was that good!

I used Head Country BBQ Sauce. Best sauce in the whole wide world. No kidding.


Pulled Pork
Source: Martha Stewart Living, January 2007
adapted by There's Always Thyme to Cook
Printable Recipe

3 tablespoons sweet paprika
2 tablespoons minced garlic
1 tablespoon packed dark-brown sugar
1 tablespoon ground mustard
salt and pepper, to taste
1 pork roast (shoulder or rump; about 5 pounds)
Barbecue sauce, any kind you like
6 brioche, challah, egg rolls or hamburger buns, split
   
Stir together paprika, garlic, sugar, ground mustard, salt and pepper in a small bowl. Rub spice mixture all over pork. You can refrigerate and marinate at least 3 hours (up to overnight). Or not, I put the rub on, but didn't have time to marinate, it still tasted fine!

Preheat oven to 300 degrees. Transfer pork to a roasting pan. Roast until an instant-read thermometer inserted into thickest part of the meat registers 170 degrees and pork pulls away easily with a fork, about 6 hours, or less for smaller roasts. Transfer pork to a cutting board; let rest 10 minutes.

Using two forks, shred warm pork into a large bowl. Add some of the barbecue sauce, and stir to coat. Spoon pork onto bottom halves of rolls; top with more sauce, and top with the roll. Serve.


Join Beth at Beth Fish Reads for her fun Weekend Cooking Party. Every weekend. So stop by Beth Fish Reads and join in on the fun! On weekend's she's reading about food and cooking, and so can you!

Weekend Cooking is open to anyone who has any kind of food-related post to share: Book (novel, nonfiction) reviews, cookbook reviews, movie reviews, recipes, random thoughts, gadgets, fabulous quotations, photographs. 

Sunday, December 26, 2010

Really Easy Chicken Pot Pie!

After all the prep for holidays and festivities since Thanksgiving, there are some times when you just want the easy way out. And this is the easy way out for me! All it takes is two pre-made pie shells, a can of Campbell's soup, a small rotisserie chicken and a bag of frozen mixed vegetables. and there you have dinner! And so good, who cares about the sodium, or the chemicals or whatever else they throw in those little cans. This is for one of those nights! Five minutes to prepare, thirty minutes later...dinner! And a salad. So I completely take the easy way out. And no one complains. Not one bit!


Really Easy Chicken Pot Pie
There's Always Thyme to Cook
Printable Recipe

2 (9 inch) deep dish frozen pie crusts, thawed (or not!)
10-oz frozen mixed vegetables, you can also use canned!
2 cups cooked, diced chicken breast
1 (10.75 ounce) can condensed cream of chicken soup
1/2 cup milk
8 cremini mushrooms, sliced thin

Preheat oven to 350 degrees F.

In a bowl combine the mixed vegetables, mushrooms, chicken, cream of chicken soup and milk. Pour mixture into one of the pie crusts. Turn the other crust over and pop out of the tin onto the top of the filled pie. Poke a small hole in top crust.

Bake for 30 minutes or until crust is golden brown.

Joining Mary's Mosaic Monday. For more mosaic's stop by the Little Red House!

Friday, December 10, 2010

Roast Chicken and Latkes!

Hanukkah is over this year, but I couldn't let another day go by without making the traditional potato pancakes! Found a new recipe for chicken, too, that I had been meaning to try! I got so busy with the latkes that I never got a chance to take a picture of the chicken! But it was a delicious recipe. Went nicely with the potato pancakes! Maple Garlic Roasted Chicken. Miss Picky asked for thin chicken cutlets instead of the thicker boneless, skinless! Anything for Miss Picky and it turned out well, we all loved it!

Some folks like sour cream on their latkes. Not us. Applesauce all the way! Alton Brown's Ten-Minute Microwave Applesauce is really easy and comes out so good. With or without the Cognac or Brandy, it's delicious! but I'm a "with" the alcohol and usually use Calvados! It gives it a nice flavor.This time I used all Fuji apples! Pretty foolproof recipe. I didn't even peel this time, instead of the immersion blender, I used the food mill!


They're good for any time, it sounds like a lot more work than they really are, but for some reason, we only make them during the holidays! The worst part? The house stinks like fried oil for a while!  But so worth it for a big batch of potato pancakes!


Potato Latkes
http://theresalwaysthyme.blogspot.com/2009/12/latkes-101.html
Printable Recipe

8 potatoes (I use Russets or Yukon Golds)
2 onions
3 eggs, beaten
3/4 cup matzoh meal (flour can be substituted)
1 teaspoon salt (more or less to taste)
1 teaspoon freshly ground black pepper (more or less to taste)
vegetable oil

Peel potatoes and coarsely grate by hand, along with the onion.  You can also use a food processor (I used the medium shredding disc for a Cuisinart Food Processor for both the potatoes and the onions.) Then put the shredded potatoes and onions into a fine strainer over a bowl and press out whatever excess liquid you can.  Pour the potatoes and onions into a bowl with the beaten eggs, salt and pepper. Mix it all together and then add a handful or two of matzoh meal. Mix to combine. Then put it all back into the strainer and let it drain as you make the latkes.

Heat about 1/2 inch of oil to medium-high heat, about 350°F. Form the mixture into pancakes about the size of your palm or you can spoon 2 tablespoons potato mixture per latke into skillet, spreading and flattening into rounds with a fork. Don't crowd the pan. Cook until the bottoms are browned, about 5 minutes. Turn latkes over and cook about 5 minutes more, until the undersides are golden brown. You can tell it's browning from the edges, don't burn them. Add more oil to skillet as needed. Too high a heat is not good, the oil should not be smoking.

Place finished latkes on paper towels to drain. Keep latkes warm on a wire rack set in a shallow baking pan in 250°F oven. Eat hot with applesauce. Or sour cream. They freeze well, to reheat, do not thaw, place frozen latkes on a rack in a sheet pan and bake at 350°F for about 10-15 minutes.


Ten Minute Microwave Applesauce
http://theresalwaysthyme.blogspot.com/2009/12/mosaic-monday-happy-hanukkah-with.html
Source: Alton Brown, Food Network
Printable Recipe

3 Golden Delicious apples, peeled, cored, and quartered (I use Granny Smith and Braeburn or all Fuji)
3 Fuji apples, peeled, cored, and quartered
1 cup unfiltered apple juice (filtered clear juice works, too)
2 tablespoons cognac or brandy (I used Calvados)
2 tablespoons butter
3 tablespoons honey
1/2 teaspoon ground cinnamon (I used more)

In a sealable microwave-safe container, combine apples with all other ingredients. Close lid, leaving one corner of lid open to allow steam to escape. Microwave on high for 10 minutes.

Using a hand blender or potato masher, blend to desired consistency. Serve hot immediately or chill for later use.

Maple Garlic Roasted Chicken
Source: Food Network, Canada - recipe by Anna Olson
adapted There's Always Thyme to Cook
Printable Recipe

8 boneless, skinless chicken breasts (I used thin sliced)
1 1/2 cups B-Grade pure maple syrup
1 head garlic
1/3 cup + 3 tablespoons malt vinegar
salt and pepper

Place chicken breasts in a shallow dish. Pour 1 cup maple syrup over chicken. Peel head of garlic and crush cloves under the flat-side of a knife and add all but 2 cloves to chicken. Add 1/3 cup malt vinegar and toss chicken to coat. Let marinate from 1 to 6 hours.

Preheat oven to 375 F and grease a roasting pan. Place chicken breasts in roasting pan, shaking off excess syrup, and season. Roast uncovered for about 25 minutes, until an internal temperature of 180 F is reached. Let chicken rest 10 minutes.

To serve, heat remaining 1/2 cup maple syrup, 3 tablespoon malt vinegar and 2 cloves of garlic. Simmer for 3 minutes, then remove garlic and keep warm. Slice chicken breasts into 3 pieces, on an angle and plate. Spoon warm syrup over and serve.

* I used thin cutlets so I poured the marinade in the baking dish so it wouldn't dry out when I baked it! When the chicken was done, I poured most of the juices (marinade) into a saucepan but left a little in the pan to keep the chicken moist and kept it warm in the oven. I boiled down the marinade to make a little bit thicker sauce. I think this would also be great with skinless chicken on the bone! *

I'm joining Suzy over at Kitchen Bouquet for another Flashback Friday!

Wednesday, September 29, 2010

Beef and Mushrooms, perfect combination!

And we have a winner! This one they loved. All of them! Miss Picky? She loved it. And the Big Kid, who once asked when my "cream sauce" stage would be over, even he liked it!


Beef and Mushroom Stroganoff
Original recipe from EatingWell - The EatingWell Healthy in a Hurry Cookbook 
Source: Cindy5_NY
Printable Recipe

2 teaspoons plus 1 tablespoon canola oil, divided
1 pound flank steak, trimmed
1 pound cremini mushrooms, cleaned, stemmed and thinly sliced
1 large onion, sliced
3/4 teaspoon dried thyme
1/2 teaspoon salt
1/2 teaspoon freshly ground pepper
3 tablespoons all-purpose flour
1 14-ounce can reduced-sodium beef broth
2 tablespoons cognac, or brandy
1 tablespoon red-wine vinegar
1/2 cup reduced-fat sour cream (I used regular sour cream)
4 tablespoons chopped fresh chives, or parsley

Heat 2 teaspoons oil in a large skillet over high heat until shimmering but not smoking. Add steak and cook until browned on both sides, 3 to 4 minutes per side. (The meat will be rare, but will continue to cook as it rests.) Transfer to a cutting board and let rest for 5 minutes. Cut lengthwise into 2 long pieces then crosswise, across the grain, into 1/4-inch-thick slices.

Heat the remaining 1 tablespoon oil in the pan over medium heat. Add mushrooms, onion, thyme, salt and pepper and cook, stirring often, until the vegetables are very tender and lightly browned, 8 to 12 minutes. Sprinkle flour over the vegetables; stir to coat. Stir in the broth, cognac (or brandy) and vinegar and bring to a boil, stirring often. Reduce heat to a simmer, and continue cooking, stirring often, until the mixture is thickened, about 3 minutes. Stir in sour cream, chives (or parsley), the sliced steak and any accumulated juices. Bring to a simmer and cook, stirring, until heated through, 1 to 2 minutes more.

Serve with egg noodles or mashed potatoes!

Monday, September 27, 2010

Roast Chickens with Black Pepper and Maple Glaze

I finally made the little chicken that was defrosting in the frig. But it's been a busy time lately and I finally managed to roast it, but then I put it in the frig and didn't get back to it until the next day. Story of my life, rushing, and not getting to cook what I wanted to so many times, but this time I didn't have to chuck it!  I knew if I cooked it ahead, I'd be able to use it for dinner the next day. Fully cooked the morning before, nice and moist if you roast the chicken with an orange (or a lemon) in the cavity.

Then the next day, I just roasted butternut squash chunks, with some teeny, tiny potatoes and sliced onions in a Maple-Black Pepper glaze. When the vegetables were pretty much fork tender, I put the roasted chicken on top and then heated the whole thing up in the oven. Basted the chicken a few times with the Maple-Pepper glaze and it turned out fantastic. It's sweet, pretty sweet, but a really nice dish. This one we'll have again. Click the link if you want to see the way it was prepared in Food and Wine magazine!

I got the wishbone, but I'm not telling what I wished for.


Roast Chicken with Black Pepper and Maple Glaze
Source: Food and Wine, April 2004 - recipe by Maria Helm Sinskey
adapted There's Always Thyme to Cook
Printable Recipe

3 tablespoons unsalted butter
1/2 cup pure maple syrup
coarsely ground pepper
2 medium onions, halved lengthwise and thinly sliced crosswise
2 teaspoons extra-virgin olive oil
salt
1 large chicken or 2 small ones
1 small orange, poke holes in it with a fork
small potatoes and butternut squash chunks (optional)

Preheat the oven to 350°. In a small saucepan, melt the butter with the maple syrup and 2 teaspoons of coarsely ground pepper. Remove the glaze from the heat. (or you can just pour the syrup and dots of butter in the pan with the onions and stir it a couple times while they roast!)

On a large heavy-duty rimmed baking sheet, toss the sliced onions with the olive oil. Season the onions with salt and pepper and spread in an even layer. Season the chicken inside and out with salt, put the orange in the cavity, then arrange the chicken on top of the onions. Loosely tie the chicken legs together with kitchen string.

Roast the chicken for about 60 minutes at 350°. Brush the chickens all over with half of the maple glaze and continue roasting them for 1 hour longer. Increase the oven temperature to 425°. Generously brush the chicken with the remaining glaze and roast until the cavity juices run clear and the chickens are nicely browned.

Transfer the chickens to a platter and let rest for 10 minutes before carving. Pour the onions and pan juices into a large glass measuring cup and skim the fat from the surface. Season with salt and pepper and serve with the chickens.

Wednesday, September 15, 2010

Eggplant, yes or no?

I don't like eggplant, at all, but after tonight I may have to change my mind!  Miss Picky and I went to our favorite shopping spot this summer to get back to school things. One of my favorite places for lunch is there, an Italian bistro, they have the most awesome fried sweet potatoes! So I had that and a salad. Miss Picky loves eggplant and decided on an eggplant ravioli with a pink sauce. You have to understand that Miss Picky never finishes what's on her plate. Very rarely. She had the entire dish. Except for one little last bite she made me try so I could attempt to make the same thing at home.

I pretty much succeeded!

and now I have to say that I love eggplant. At least in ravioli! I googled eggplant ravioli and came with two recipes that looked good to me. One was more work than the other. Eggplant Parm Ravioli from Rachael Ray and Eggplant-filled Ravioli with Tomato Cream Sauce that was on a bunch of sites, originally from Bon Appetit.  So I used a little from each and came up with a winner according to Miss Picky!  I cheated this time and used a jarred sauce because I wasn't sure how much time the eggplant and the ravioli would take. Not too labor intensive at all. Next time I'll make it with the vodka sauce recipe from Lidia Bastianich, it's a great recipe!


The filling would be great as a filling for lasagna, too! Or as a warm dip with some toasted slices of a baguette.

but it made a delicious ravioli! I'm an eggplant convert! Miss Picky was right.


Eggplant Parm Ravioli with Vodka Sauce
adapted by There's Always Thyme to Cook
Source: Eggplant Parm Ravioli from Rachael Ray and Eggplant-filled Ravioli with Tomato Cream Sauce from Bon Appetit, September 1987
Printable Recipe

1 eggplant, peeled and chopped in chunks
3 1/2 tablespoons extra-virgin olive oil
2 cloves garlic, smashed and peeled
Salt and pepper
1 cup shredded mozzarella cheese
1/4 cup plus 1/4 cup grated Parmesan cheese
1/4 cup plain dried breadcrumbs
a splash of white wine, I used Sauvignon Blanc
1 quart vodka sauce (recipe below or use your favorite jarred sauce!)
1 package egg roll or won ton wrappers (I used won ton wrappers, Nasoya brand)
fresh basil, for garnish

1/2 cup warm water

Using a food processor, finely chop the eggplant and garlic cloves. In a large nonstick skillet, heat 1½ tablespoons olive oil over medium-high heat. Add the eggplant and garlic, season with salt and pepper and cook, stirring, until browned, about 10 minutes. Add the wine, and cook that down for another couple of minutes. Stir in the bread crumbs and cook for another few minutes. Check for seasoning. Stir in the mozzarella and 1/4 cup parmesan cheese. When it's all melted together, transfer to a bowl.


Bring a large pot of salted water to a boil. Fill each wrapper with 1 rounded tablespoon of the eggplant mixture; moisten the edges with water and fold in half, or for a larger ravioli, put 1 1/2 tablespoons eggplant mixture in the middle of one wrapper, moisten the edge and top with another wrapper, pressing the edges to seal. Working in 2 batches, cook the ravioli until tender, about 4 minutes. Using a slotted spoon, transfer the ravioli to plates or use one bowl, top with vodka sauce, sprinkle with Parmesan cheese and fresh basil and serve .

Note: You can freeze the uncooked ravioli, separately on a baking shit, when frozen put them in a ziploc freezer bag. When you want to use them, do not thaw.

Vodka Sauce:
Source: Lidia's Italian-American Kitchen by Lidia Bastianich


salt
One 35-ounce can Italian plum tomatoes (preferably San Marzano) with their liquid
1/4 cup extra-virgin olive oil
10 cloves garlic, peeled (I use a lot less, maybe 2-3)
crushed hot red pepper (to taste) (I used about 2 pinches)
1/4 cup vodka
1/2 cup heavy cream (I use less, a bout 1/3)
2 tablespoons butter or olive oil for finishing the sauce (optional)
2 to 3 tablespoons chopped fresh Italian parsley
3/4 cup freshly grated Parmigiano-Reggiano

Pour the tomatoes and their liquid into the work bowl of a food processor. Using quick on/off pulses, process the tomatoes just until they are finely chopped. (Longer processing will aerate the tomatoes, turning them pink.)

Heat the olive oil in a large skillet over medium heat. Whack the garlic cloves with the side of a knife and add them to the hot oil. Cook, shaking the skillet, until the garlic is lightly browned, about 3 minutes. Lower the work bowl with the tomatoes close to the skillet and carefully (they'll splatter) slide the tomatoes into the pan. Bring to a boil, season with salt and with crushed red pepper to taste (you can always add more it needed!) and boil about 2 minutes. Pour in the vodka, lower the heat so the sauce is at a lively simmer, and simmer for a few minutes.

Take the garlic cloves out of the sauce and pour in the cream. Add the 2 tablespoons butter or oil, if using, and carefully swirl the skillet to incorporate into the sauce. Check the seasoning, adding salt and red pepper if necessary. Simmer until the sauce is reduced a bit.

Remove the pot from the heat, sprinkle a little cheese in the sauce and stir. Serve immediately, serve with additional cheese if you like.

*My note - Sometimes I add a little pancetta or prosciutto, about 1/4 lb. sliced thin and cut into 1/2-inch pieces, to the sauce. Saute it with the garlic.

Thursday, August 26, 2010

Spicy Grilled Potatoes

Way back in July, Bobby Flay was on The Morning Show at CBS. Didn't always love Bobby Flay, but I do now. Especially considering the shows that the Food Network has on these days. I have a few of his books, his recipes have all turned out great for us. This time he was making little bites. And they looked so good. The little grilled potato rounds got me. Looked the recipe up online and saved it. and here it is end of August and I am finally getting to it.  And it was worth the wait.

We love this sauce! Spicy Tomato-Chipotle Aioli. I adapted it to my way of lazy cooking. I think it would be good on most anything! The recipe called for grilled potatoes and it was delicious with potatoes. We were having a porterhouse and somehow that sauce managed to get on the steak, too. So good. I think it would be nice with chicken and with shrimp. And definitely on a sandwich or a panini.

The recipe called for grilling the tomatoes, grilling the potatoes and there was no way the Griller would be fussing with that, not to mention I used some teeny potatoes. So I had that panini grill, I got my money's worth out of it already, and threw the parboiled potatoes on that! Squished them down pretty good, until they got good and somewhat crispy. The tomatoes I broil with a little salt, pepper and about three cloves of garlic. I threw the garlic in towards the end so they didn't burn. Then I strained the tomatoes and whizzed everything in a food processor. Today's sauce will be on tomorrow sandwich! Steak Panini with cheese and Tomato-Chipotle Aioli. Can't wait.


  Parboiled potatoes grilled and "smashed" on the panini grill


Roasted Tomato Sauce


Spicy Tomato-Chipotle Aioli


Grilled, Smashed Potatoes with Spicy Tomato-Chipotle Aioli


Grilled Potatoes with Spicy Tomato Aioli
Source: Bobby Flay - CBS The Early Show and also Food Network
Printable Recipe

1 1/4 pounds new potatoes (yellow and red) or baby Yukon Gold (You can use a large potatoes and slice them thick or small ones and cut in half, or leave the small ones whole and smash them)
Salt
2 plum tomatoes
1/4 cup olive oil
Freshly ground black pepper
1 cup mayonnaise
3 cloves garlic, chopped
2 teaspoons Spanish paprika
1-2 chipotle in adobo sauce (depends how hot you like it)
1 teaspoons Ancho chile powder, or more to taste
2 tablespoons finely chopped fresh flat leaf parsley

Place the potatoes in a large pot of cold water, add 2 tablespoons of salt and cook until potatoes are tender, but still firm, about 12 to 15 minutes. Drain, let cool and cut each potato into 3/4 -inch thick slices.  You can microwave until just tender as well.

Heat the grill to high.  Or you can use a panini grill.

Brush the tomatoes with the some of the oil and season with salt and pepper. While the potatoes are cooking, place the tomatoes on the grill and grill until charred on all sides and soft, about 10 minutes. Remove from the grill and coarsely chop. You can also just roast them at 350 for about an hour until they get soft and start to brown. Or broil for about 10-15 minutes. Turning them once.

You can strain the tomatoes to get rid of the seeds and the skins.

Place the tomatoes, mayonnaise, garlic, paprika, chipotles and chile powder in a food processor and process until smooth, season with salt and pepper. Can be made 1 day in advance and refrigerated.
Brush the potatoes slices on both sides with some of the oil and season with salt and pepper. Place the potatoes on the grill, close the cover and grill until lightly golden brown and just cooked through, about 2 minutes per side. I used a panini grill and made them "smashed" potatoes. Carefully transfer the potatoes to a platter and garnish with the parsley. Serve the aioli drizzled over the potatoes or on the side.

 ~~~~~~~~~~~~~~~~~~~~~~~~~~~~~~~


I'm joining Suzy from Kitchen Bouquet for Flashback Friday! Flashing back to my first Panini Grill post!  It's gotten plenty of use since that day I decided I just had to have one. More use than the bread machine, more than the ice cream maker, more than the waffle maker, more than..., well, you get the picture!

Tuesday, August 17, 2010

Cheddar Burgers

Was one of those days, late start for dinner. Couldn't think of anything good. Decided on grilling burgers. Easy enough, the Griller does most of the work :) But I didn't want just a plain old cheeseburger so I started looking online for ideas. Epicurious. Typed BURGERS in the search box. Lot of hits. Found exactly what I was looking for by the third page. Cheddar Burgers with Balsamic Onions and Chipotle Ketchup. Sounded great and it had great reviews. I agree with them.

Chipotle ketchup, is my new favorite condiment. Ok, so chipotle mayo is still my number one, but this is really good stuff! Make it as hot and smoky as you like. I can see using this on a lot of things!


Balsamic Grilled Onions. You can use a grill or a grill pan. I used a panini griller. The Griddler. Came out great. Didn't take long at all, cooked on both sides in minutes. My Griller has issues with vegetables falling through the grates, so this was perfect! He was in charge of the burgers while I took care of the condiments and the sides. Good team. Great dinner!


My burger had Farmhouse Cheddar, balsamic onions, fresh baby spinach, tomatoes, avocado and chipotle ketchup. We used pre-made patties because we were running late. So what else is new? Next time we won't. A little chipotle ketchup mixed in with the ground beef would be even better. Bacon would be good, too! Lots of possibilities! The original recipe called for an English muffin, we had burger buns, but I think a toasted English muffin would be perfect with this burger. A nice change from the buns!


Fresh corn on the cob and cole slaw round out the meal. The cole slaw recipe can be found here.


Cheddar Burgers with Balsamic Onions and Chipotle Ketchup
Source: Bon Appétit - July 2008, recipe by Tony Rosenfeld
Printable Recipe

Onions:
2 red onions, cut crosswise into 1/3- to 1/2-inch-thick rounds
olive oil
3/4 teaspoon coarse kosher salt
1/2 teaspoon coarsely ground black pepper
2 tablespoons balsamic vinegar

Chipotle ketchup:
1 1/4 cup ketchup
2 chipotle chiles, chopped, from canned chipotles in adobo plus 3 tablespoons adobo sauce from can
1 tablespoon balsamic vinegar

Burgers:
2 1/4 pounds ground beef, made into six 1/2-inch thick patties
Coarse kosher salt (for mixing into the burgers, for pre-made patties sprinkle a little on each side)
6 thick slices sharp cheddar cheese (or any cheese you like)
6 large English muffins or hamburger buns, split, cut sides grilled
6 tomato slices
2 cups fresh spinach leaves (romaine leaves, or any greens you like)

For onions:
Prepare grill (medium-high heat): Arrange the onion rounds on a baking sheet. Brush with oil; sprinkle with 3/4 teaspoon coarse salt and pepper. Transfer onion rounds (still intact) to grill rack; close cover. Cook until grill marks appear, about 4 minutes per side. Reduce heat or move onions to cooler part of grill. Close cover; cook until onions are tender, about 10 minutes. Transfer to medium bowl. Toss with vinegar. Refrigerate. Can be made a few days ahead.

For chipotle ketchup:
Mix ketchup, chiles, adobo sauce, and 2 teaspoons vinegar in a small bowl. Or whiz it up in a food processor. Season with salt and more vinegar, to taste. Can be made 3 days ahead. Cover and chill.

Prepare grill (medium-high heat). Place burgers on grill. Close cover; cook burgers until bottoms start to darken and juices rise to surface, about 3 minutes. Turn burgers; cook to desired doneness. Top with onions and cheese. Close cover; cook until cheese melts. Place muffin bottoms on plates; spread with ketchup. Top with burgers, tomatoes, spinach, avocado and muffin tops. Serve, passing the remaining ketchup.

*You can also mix a little of the chipotle ketchup into the burger meat mix!

Saturday, June 26, 2010

Fried Chicken Cutlets

Since I had an abundance of roasted tomatoes, and I spent the day frying and freezing chicken cutlets, I figured for dinner I'd make something up to use both. So I rummaged through the frig and came up with a bag of fresh baby spinach. Lined a sheet pan with the spinach, drizzled it with olive oil, garlic, salt and pepper and put a fried cutlet on top. Topped that with some shredded mozzarella and then topped it off with yesterday's roasted tomatoes.

On the side was Penne alla Vodka. With whole wheat pasta.  It was a bad idea to serve it with the whole wheat. We like regular pasta better or that smart taste pasta or whatever kind of pasta, the kind that leans more towards regular but says it's healthier for you. Just not straight whole wheat. Kind of gritty, grainy, and tasted it like cardboard. Not that we've ever eaten cardboard. Not that I know of anyway. This was Trader Joe's whole wheat penne, maybe it's just more whole than we are used to, the pizza place has whole wheat we like with a broth sauce and some vegetables, maybe it's less than whole? The vodka sauce came from a jar, that was good. Can't all be from scratch when you're in a rush for dinner! And somehow, we're always in a rush for dinner.


 Chicken cutlets fried with fresh breadcrumbs


 Spinach, chicken, mozzarella, Parmesan and roasted tomatoes ready for the oven


Time for dinner...

Saturday, May 8, 2010

Chicken for dinner. What else?

Should have called my blog, 1001 ways to make chicken cutlets! Found another great way! Good thing we really like chicken. This one is from epicurious, called Chicken Louisa.

The recipe called for Roma tomatoes and I found some baby Roma's at the grocery store!  Come summer, hopefully I'll have my own homegrown baby Roma's, but if you find these, try them, they're very good. Very sweet and they're also excellent roasted.


Chicken Louisa, served with brown rice and baby bok choy, sauteed with shallots and garlic! and not one bit of a screw up with this one. Finally. No smoke alarm, no deleted pictures, it all went perfectly smooth! Another keeper!


Chicken Louisa
adapted
Source: Gourmet - June 2000, recipe by Peter Micheli
Printable Recipe

4 chicken cutlets, pounded thin
1 tablespoon olive oil
1 tablespoon unsalted butter
1 medium shallot, sliced thin
1/2 cup dry vermouth (or use dry white wine)
3/4 cup heavy cream
4 or 5 plum tomatoes, coarsely chopped
2 tablespoons finely chopped fresh tarragon
1/2 extra-large chicken-bouillon cube, crumbled

Garnish: chopped fresh chives

Season with salt and pepper. Heat the oil and butter in a large heavy skillet over moderately high heat until the foam subsides. Brown chicken on both sides in 2 batches, about 3 minutes per batch. Transfer chicken to a plate and keep warm.

Add shallot to skillet and saute, stirring, until tender, about a minute. Add the vermouth and boil over high heat, scraping up brown bits, until reduced by half. Stir in cream, tomatoes, tarragon, and bouillon cube, then simmer, stirring, until tomatoes are softened and sauce begins to thicken, about 4 minutes. Season with salt and pepper.

Return chicken, with any juices accumulated on plate, to skillet and simmer until cooked through, about 5 minutes.

Serve immediately.

Thursday, April 29, 2010

Grilled Fish Taco's!

Not sure what's happening to us, but we're eating a lot more fish lately. and enjoying it, too! That's the surprise of it, I can get them to eat it, healthy and all, but getting them to like it and ask for it, another story. Well, that one kid, she'll have no part of it, will never eat it. She has her likes and won't deviate. Maybe the seven year rule will apply. Someone once said in a cooking forum, to try things you don't like every seven years, your tastes may change. Seemed to have worked with the fish, but no way will I ever like asparagus. Hasn't happened yet. The picky one, she loves it. Go figure.

Made Turkey Taco's for Miss Picky, used the same spices that I do for beef and just subbed ground Turkey! We had the Grilled Fish Taco's. I've made them before using a similar recipe. Loved that one and I forgot all about it and ended up finding a new one, also at epicurious. but I like tweaking and searching for new recipes, so it worked out fine. Everyone was happy!


I poured the marinade in a Ziploc bag to marinate the fish, less dishes to wash. and because we don't like the smell of cooking fish in the house, the Griller put it in a foil disposable pan and cooked it outside on the grill. I served it in one piece instead of flaked. I also mixed the Crema in with shredded cabbage and served that inside the taco, along with fresh tomato salsa and the pickled onions.We had whole wheat tortilla's, instead of corn or flour.

Can't be all that healthy, we had Italian cream ice for dessert!


Fish Tacos
Source: adapted from Epicurious, May 2009 – recipe by Lourdes Castro, Simply Mexican
Printable Recipe

1/2 red onion, thinly sliced
About 1 1/2 cups red wine vinegar (I used 1/2 cup rice wine vinegar, a little less than 1/4 cup simple syrup and some water)
1/4 cup olive oil
1 1/2 teaspoons ancho chile powder
1 1/2 teaspoons dried oregano (I used Mexican oregano)
1/2 teaspoon ground cumin
1/4 cup lightly packed fresh cilantro leaves, chopped, plus more for garnish
1 jalapeño, stemmed and chopped
1 pound flaky white fish (such as mahi mahi or cod), cut into 4 pieces
salt and pepper
8 fresh corn tortillas (I used whole wheat)
Mexican crema, homemade or store-bought (I mixed 1 cup sour cream with the zest and juice of one lime, jalapeno, a little salt and pepper)
Fresh Tomato Salsa
2 limes, cut into quarters

Put the onion in a small bowl and pour in the vinegar to cover well. Set aside for at least 30 minutes or up to several weeks.

Pour the olive oil into a small bowl and add the ancho chile powder, oregano, cumin, chopped cilantro, salt, pepper and jalapeño. Mix well. Place the fish on a dish and pour the marinade over it, making sure to coat the fish well on both sides. Allow to marinate for 20 minutes. (I put it in a Ziploc bag to marinate)

Heat a nonstick sauté pan over medium-high heat. Place the fish in the pan, no need for more oil. Cook the fish for about 4 minutes, then turn over, and cook for another 2 minutes. Remove the pan from the heat and flake the fish into the pan with a fork, making sure to mix in all the marinade that has stuck to the bottom of the pan. Check if it needs more salt and pepper. I cooked it on the grill, in a disposable aluminum pan and left the pieces whole!

Place four of the tortillas on a plate and sandwich them between two slightly dampened sheets of paper towel. Microwave on high for about 45 seconds. Place the warm tortillas in a towel-lined basket or plate and cover. Repeat with the remaining tortillas.

To assemble the tacos, place a big spoonful of the fish onto the center of a tortilla. Top with the marinated onions. I also added a sort of cole slaw to the taco's. Serve with salsa.

Fish Taco Cole Slaw
1 bag shredded green cabbage
1 cup sour cream
juice and zest of one lime
minced fresh jalapeno (half of one jalapeno)
salt and pepper to taste

Combine the sour cream with the lime juice, zest, jalapeno, salt and pepper. Mix shredded green cabbage in with the crema and refrigerate for about 20 minutes.

Saturday, April 24, 2010

Lightening up General Tso!

Cooking up a storm lately! The spring weather must be giving me some extra energy or something. Tomorrow it's back to ordering in, it's been enough of a streak for now! I think stir fry is one of the easiest meals to make for dinner. So I tried looking for something new. We always have Chicken with Cashews. So I went looking for something a little different. Found this one at Martha Stewart. It was very good. but next time I'd use a lot less sugar! and maybe a little less pepper, almost took out Grandma, LOL!


Lighter General Tso's Chicken
Source: Everyday Food – October, 2008
Printable Recipe
(adapted)

1 1/4 cups long-grain brown rice
1/4 cup cornstarch
1 pound snow peas, trimmed and halved crosswise
4 garlic cloves, sliced (I used 3 minced cloves)
2 teaspoons fresh ginger, grated and peeled
3 tablespoons light-brown sugar (next time I'd cut it to 1or 2 T)
2 tablespoons soy sauce
1/2 teaspoon red-pepper flakes
2 large egg whites
Coarse salt and ground pepper
1 pound boneless, skinless chicken breasts, cut into 1-inch pieces
2 tablespoons vegetable oil

Cook rice according to package instructions. In a bowl, stir together 1 tablespoon cornstarch and 1/2 cup cold water until smooth. Add snow peas, garlic, ginger, sugar, soy sauce, and red-pepper flakes; toss to combine, and set aside.

In another bowl, whisk together egg whites, 3 tablespoons cornstarch, 1/2 teaspoon salt, and 1/4 teaspoon pepper. Add chicken, and toss to coat.

In a large nonstick skillet, heat 1 tablespoon oil over medium-high. Lift half the chicken from egg-white mixture (shaking off excess), and add to skillet. Cook, turning occasionally, until golden, 6 to 8 minutes. Transfer to a plate; repeat with remaining oil and chicken, and add the rest of the cooked chicken and any juices, along with the snow-pea mixture to skillet. Toss to coat. Cook until snow peas are tender and sauce has thickened, 3 to 5 minutes. Serve with rice.

Wednesday, April 21, 2010

Kebabs! Satés! Dinner on a Stick!

My friend, Woodie, went and did it. She had mentioned chicken wings made with Mikey's Jerk Marinade (a family recipe!) a few months ago and I couldn't wait to try it. They were a big hit here during the Superbowl.

and now Woodie was talking about visiting her relatives again and having Mike's marinade sloshed all over some chicken kebabs. Now that got me craving all over again! Only I wanted beef, not chicken for what seems like the 112th time this month. So the Griller did me a favor and ran to the butcher to pick up some sirloin and a skirt steak for Miss Picky! A skirt steak kebab will work for her. and all those grilled vegetables. Served on a bed of rice from the local Middle Eastern/Israeli grocery here in town. They called it Mejedra. Rice, lentils and onions. Lots of flavor. I've googled it.  Tons of spellings,  and recipes. I think I could make it myself. But they make it so good, why bother? So I didn't.


Here's the link to the marinade with the wings...   Mikey's Jamaican Jerk Wings!
Here's the link to the Tuna Satay... Tuna Satés with Wasabi Mayo!


Jamaican Jerk Vegetable and Beef Kebabs, Tuna Satés ready for the grill!
Soak the bamboo skewers in water for an hour, use two skewers for each kebab to prevent the food from rolling around or falling off! We didn't lose a piece to the grill, we did lost a piece or two to the Griller! He's had dibs on first taste!


Grilled and ready to plate!


Tuna Satés with Wasabi Mayo
posted by Ilisa at The Ramen Chronicles blog
Printable Recipe

You can cut this recipe in half for a smaller group.

1 1/2 cup mayonnaise
1/2 cup sour cream
1/4 cup soy sauce
1 1/2 tablespoons sugar
juice of one lemon
5 tablespoons wasabi paste, or to taste
4 12-ounce tuna steaks, cut into 1-inch cubes

Stir all ingredients together. Put tuna cubes in a bowl and cover with 1 cup (or more, if needed) of the wasabi mixture. Marinate in the refrigerator overnight. Put remaining wasabi mixture in a bowl for dipping and refrigerate overnight.

Either sear tuna in a very hot pan with olive oil, just a minute each side, or stick it on a prepared skewer and grill over very hot coals for a few minutes each side. Serve tuna satés with chilled wasabi mayo for dipping.


Mikey's Jamaican Jerk Marinade
Source: AnnieWoodie
Printable Recipe

4 Scotch Bonnet chilies (or any hot pepper, amount depending upon your taste - we use much less than called for!)
1 bunch scallions (both white & green parts, trimmed and coarsely chopped
2 shallots - halved
1 small onion - quartered
2 cloves of peeled garlic
1 tablespoon grated fresh ginger
2 teaspoons chopped thyme or 1 teaspoon dried
2 teaspoons ground allspice
3 tablespoons canola oil
3 tablespoons soy sauce
3 tablespoons lime juice
2 tablespoons packed brown sugar
2 tablespoons salt
1 teaspoon ground black pepper
1 cup of water

This is enough to marinate 4 pounds of meat

Combine chiles, scallions, shallots, onion, garlic, ginger, thyme, allspice, oil, soy, lime juice, sugar, salt, pepper, and water. Blend in a blender until smooth. Marinate from a few hours to several days and grill until done.

Tuesday, April 20, 2010

Penna alla Vodka

This was really good. Really fattening. But really good. and that's all I have to say today :)


Penne alla Vodka
Source: Lidia's Italian-American Kitchen by Lidia Bastianich
Printable Recipe

salt
One 35-ounce can Italian plum tomatoes (preferably San Marzano) with their liquid
1 pound penne
1/4 cup extra-virgin olive oil
10 cloves garlic, peeled (I use a lot less, maybe 2-3)
crushed hot red pepper (to taste) (I used about 2 pinches)
1/4 cup vodka
1/2 cup heavy cream (I use less, a bout 1/3)
2 tablespoons butter or olive oil for finishing the sauce (optional)
2 to 3 tablespoons chopped fresh Italian parsley
3/4 cup freshly grated Parmigiano-Reggiano

Bring 6 quarts of salted water to a boil in an 8-quart pot over high heat.

Pour the tomatoes and their liquid into the work bowl of a food processor. Using quick on/off pulses, process the tomatoes just until they are finely chopped. (Longer processing will aerate the tomatoes, turning them pink.)

Stir the penne into the boiling water. Bring the water back to a boil, stirring frequently. Cook the pasta, semi-covered, stirring occasionally, until done, 8 to 10 minutes.

Meanwhile, heat the olive oil in a large skillet over medium heat. Whack the garlic cloves with the side of a knife and add them to the hot oil. Cook, shaking the skillet, until the garlic is lightly browned, about 3 minutes. Lower the work bowl with the tomatoes close to the skillet and carefully (they'll splatter) slide the tomatoes into the pan. Bring to a boil, season with salt and with crushed red pepper to taste (you can always add more it needed!) and boil about 2 minutes. Pour in the vodka, lower the heat so the sauce is at a lively simmer, and simmer until the pasta is ready.

Just before the pasta is done, take the garlic cloves out of the sauce and pour in the cream. Add the 2 tablespoons butter or oil, if using, and carefully swirl the skillet to incorporate into the sauce. If the skillet is large enough to accommodate the sauce and pasta, take the pasta out of the boiling water with a large wire skimmer or a small strainer and drop it carefully into the sauce in the skillet. If not, drain the pasta, return it to the pot, and pour in the sauce. Bring the sauce and pasta to a boil, stirring to coat the pasta with sauce. Check the seasoning, adding salt and red pepper if necessary. Sprinkle the parsley over the pasta and boil until the sauce is reduced enough to cling to the pasta.

Remove the pot from the heat, sprinkle the cheese over the pasta, and toss to mix. Serve immediately, serve with additional cheese if you like.

My note - Sometimes I add a little pancetta or prosciutto, about 1/4 lb. sliced thin and cut into 1/2-inch pieces, to the sauce. Saute it with the garlic.

Monday, April 19, 2010

Chicken Milanese with Arugula Salad

Something so simple as chicken cutlets can be so fantastic. We all totally enjoyed this. Basic breaded and fried cutlets, with just a few ingredients and a simple recipe becomes really outstanding! Just the addition of arugula salad on top, sprinkled with lemon and olive oil dressing and some shavings of Parmigiano-Reggiano turn this into a flavorful, unforgettable dish! There was none leftover or I'd be having it again for lunch today!


Chicken Milanese with Arugula Salad
Source: Easy Entertaining with Michael Chiarello, Food Network
adapted, inspired, whatever, I sort of followed the recipe somewhat!
Printable Recipe

8 (2-ounce) pieces boneless, skinless chicken breast (I use Perdue thin-sliced cutlets)
salt
Freshly ground black pepper
Parmesan wedge
1 lemon, quartered

Coating:
2 cups dried plain bread crumbs (I also mixed in some fresh bread crumbs from a baguette I had and whizzed in the food processor!)
1/2 cup freshly grated Parmesan
2 tablespoons minced fresh Italian parsley leaves
1 teaspoon salt
freshly ground black pepper
1 cup unbleached all-purpose flour
3 eggs
Olive oil, for frying

Arugula Salad:
arugula, washed and stemmed (about 8 cups)
Some red onion, sliced thin
Extra-virgin olive oil
Fresh lemon juice
Salt and freshly ground black pepper
Parmesan shavings

Preheat oven to 350 degrees F.

With a meat mallet or a rolling pin, pound the chicken cutlets between sheets of plastic wrap to 1/8-inch thickness. Season the cutlets with salt and pepper.

Make the coating: Combine the bread crumbs, cheese, parsley, salt, and pepper in a small bowl. Spread the mixture on a large plate. Spread the flour on another large plate. Break the eggs into a bowl and beat lightly. Dip the cutlets in the flour, coating both sides and shaking off the excess. Then dip in the egg, letting any excess drip back into the bowl. Finally, coat the cutlets on both sides with the seasoned bread crumbs, pressing them into place. As each cutlet is coated, place it on a tray. Cover the cutlets and refrigerate until you are ready to fry them.

Heat a large skillet over high heat until very hot. Add olive oil to a depth of 1/4-inch. When the oil is almost smoking, add as many cutlets as the skillet will hold comfortably; do not crowd the pan. Cook until the cutlets are golden on the bottom. Turn and cook on the second side until browned on that side, about a minute or two. Lift the cutlets carefully, as they are done, allowing any excess oil to drain back into the skillet, and transfer to cookie sheet lined with paper bag to drain excess oil. Repeat with the remaining cutlets.

When ready to serve, place chicken cutlets on cookie sheet to finish cooking, about 2 minutes.

In a bowl, whisk together the oil and lemon juice; season with salt and pepper. Add arugula and onion; toss well.

Divide the cutlets among 4 plates, placing them in the center. Spoon a little red sauce on each side of the cutlets, if you like. (I use marinara.) Mound an arugula salad on top. With a vegetable peeler, shave a little Parmesan on top of the salad. Serve with lemon wedges on the side.

Monday, April 12, 2010

Skirt Steak Tacos with Spicy Sour Cream

Definitely on a recipe roll lately, this one was another keeper! Miss Picky loves skirt steak. So I try to come up with some new ways to flavor it instead of the usual sauces I always use. Fine Cooking magazine had one that I bookmarked that looked really good. And Mr. Griller once again got to do the cooking part, making life much easier, for me at least!

No mess, no fuss. Works perfectly. Especially since he discovered the low heat setting opposed to the "char" setting and "holy shit get a fire extinguisher" setting of yesteryear on the grill!

Love a fast dinner that you can put together in less than an hour. Added a little more spice for more flavor. Forgot the lettuce, but added beans and corn. That was good. We used whole wheat tortilla's and the grill was off by the time I remembered to warm them, so we didn't. Not the biggest deal. At least to me. We had dinner before 7:30pm, that's an accomplishment here sometimes! We'll be having this one again and again!


Skirt Steak Tacos with Spicy Sour Cream
Source: Fine Cooking 104 – April/May 2010, recipe by Adeena Sussman
Printable Recipe

1/2 cup sour cream
1/4 teaspoon ground chipotle chile (I used about a tablespoon of sauce from a can of chile in adobo)
kosher salt
1 tablespoon extra-virgin olive oil (I used way more!)
1 teaspoon ground cumin (I used at least a tablespoon)
Freshly ground pepper
1 lb. skirt steak (3/4 inch thick) (I used a little less than 2 lbs for four people! and had the butcher pound it thinner in the thicker part)
Eight 6-inch flour or corn tortillas
1/4 small head iceberg lettuce, shredded (2 cups)
2 medium ripe tomatoes (8 oz. each), cored and chopped (2 cups)
1 medium ripe avocado, pitted, peeled, and sliced 1/4 inch thick
1/3 cup chopped red onion

*my note -- I also added some ground coriander, ancho chile powder and a little garlic powder to the rub! Black beans and corn go nicely on the side or in the taco.

Prepare a medium-hot charcoal or gas grill fire. Combine the sour cream, chipotle, and 1/4 teaspoon salt in a small bowl. Set aside at room temperature to let the flavors meld.

In a small bowl, mix the olive oil, cumin, 1/2 teaspoon salt, and 1/4 teaspoon pepper. Rub this mixture on all sides of the steak. Grill the steak, covered, flipping once, until medium rare, 3 to 4 minutes per side. Transfer the steak to a large plate to rest for at least 5 minutes.

Meanwhile, warm the tortillas on the grill for about 30 seconds per side. Slice the steak across the grain into 1/4-inch-thick slices. Fill each tortilla with some of the steak, lettuce, tomato, avocado, and onion. Drizzle with the sauce and serve.

Thursday, April 8, 2010

Another great chicken recipe...

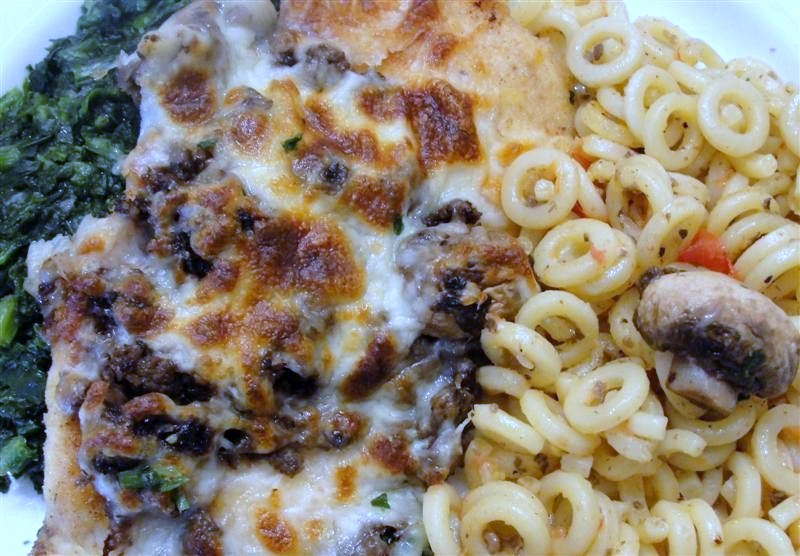
Chicken Gismonda. We loved this one! Really loved it. Spinach. Cheese. Mushrooms. Has a little bit of everything! Left the cheese off for Miss Picky. Definitely another keeper recipe! I used whole and chopped mushrooms, and added a splash of Madeira with the mushrooms! I served it with a side of anelletti pasta, mixed with a little bit of the mushrooms, a little Parmesan, some chopped tomato and a little bit of olive oil! That was a good improvisation of just throwing things together. Great dinner and it took less then 45 minutes. Maybe 30 but who's counting?


Chicken Gismonda
Source: The Los Angeles Times - created by the Rangoon Racquet Club, Beverly Hills
Printable Recipe

2 whole chicken breasts, boned and split (I used thin-sliced chicken cutlets)
salt and pepper
1/2 cup dry bread crumbs (plain)
1/2 cup butter or margarine (I did half butter, half olive oil)
2 pound spinach; cleaned and stemmed (I used frozen chopped spinach)
1 cup minced mushrooms (I whizzed in the food processor)
a splash or two of Madeira or Sherry
shredded mozzarella cheese
whole mushrooms (optional)

Season chicken to taste with salt and pepper. Roll in bread crumbs and saute in 4 tablespoons butter in skillet until cooked through.

Meanwhile, blanch spinach in boiling water 1 minute. Drain. Brown half of remaining butter in another skillet and saute spinach until just tender. Remove chicken from pan and add remaining butter. Add minced mushrooms and saute until light brown. A little salt and pepper to taste. Pour in a little Madeira and saute until it's reduced a bit.

Place spinach in a large baking dish that can go under the broiler. Arrange chicken breasts over the spinach and cover with the mushrooms. Drizzle butter remaining in the pan over chicken and mushrooms. Top with mozzarella cheese and place under the broiler until the cheese is melted and bubbling. Garnish with whole mushrooms, if desired.

Monday, March 22, 2010

Pasta Fantastic!

On Sundays we all eat dinner as a family, no ifs, ands or buts! Friends are always welcome, but it is the one day we can usually all manage to sit down together. Sometimes we order in, depending on how the day went and sometimes I experiment on those poor unsuspecting souls! Mostly they are ok with my experiments. They are particular about cheese, they didn't love the cream sauce stage I went through a few years back. But for the most part will try anything once. Except for Miss Picky. She presents a challenge. Not a good taster at all, not even a bite, unless we resort to bribery. It works. Sometimes. She wouldn't admit to liking something new anyway, just because. Usually. This time she did. They all did. Baked Penne with Chicken and Sun-Dried Tomatoes. It was a pasta dish that was fantastic! Really!

If you know me by now, you know I have yet to follow directions exactly. So I didn't have whole milk. I used 1% milk and it was fine. It was also kind of lumpy when I tried to add all that flour to the butter, and then the milk, so I used a stick blender to whiz it up when it made the milk lumpy. really lumpy. Worked fine, no lumps :) I still don't get why I needed to add those extra tablespoons of flour. It's cooking not baking, not an exact science?  It thickened up fine without them. Sometimes I luck out and do well in spite of rushing at the last minute to come up with a good dinner. This was one of those times. This will be added to the hit list!

Ready to bake...


Fresh from the oven...


Ready to eat...

Baked Penne with Chicken and Sun-Dried Tomatoes
Source: Martha Stewart Everyday Food, January 2009
Serves 8

6 tablespoons butter, plus more for baking dishes
coarse salt and ground pepper
1 pound penne rigate
1 teaspoon olive oil
2 boneless, skinless chicken breast halves (8 ounces each), halved horizontally -- I sliced them in small bite-size pieces
1/2 cup plus 2 tablespoons all-purpose flour (spooned and leveled)
4 garlic cloves, minced
6 cups whole milk -- I used 1% milk
10 ounces white mushrooms, trimmed and thinly sliced
1/2 cup oil-packed sun-dried tomatoes, drained and thinly sliced
1 1/2 cups shredded provolone (6 ounces) -- I used shredded mozzarella
1 cup finely grated Parmesan (4 ounces)

Preheat oven to 400. Butter two shallow 2-quart baking dishes. In a large pot of boiling salted water, cook pasta 3 minutes short of al dente; drain pasta, and return to pot.

In a large nonstick skillet, heat oil over medium-high. Season chicken with salt and pepper; cook until opaque throughout, 3 to 5 minutes per side. Halve each piece lengthwise, then thinly slice crosswise.In a 5-quart Dutch oven or heavy pot, melt butter over medium. Add flour and garlic; cook, whisking, 1 minute. While whisking, gradually add milk; bring to a simmer, whisking frequently. Add mushrooms and tomatoes; cook 1 minute. Off heat, gradually stir in provolone and 1/2 cup Parmesan.

Add chicken and pasta to pot; season with salt and pepper. Pour the mixture into a large baking dish; sprinkle with Parmesan.

Bake, uncovered, until top is golden and bubbling, about 25 minutes. Let stand 5 minutes before serving.

Make ahead: You can also freeze it for a ready-made dinner another time. When ready to cook, bake it straight from the freezer, covered in foil. Prepare it as directed, but do not bake it; let cool. Cover tightly with foil, and freeze, up to 3 months. When ready to use it, preheat oven to 400, and bake (still covered in foil) on a rimmed baking sheet until center is hot, about 1 1/2 hours. Remove foil; bake until golden, about 15 minutes more.
Back to top